sew
Toddler things
While our family is cozy and warm here in Lima, I thought I would take a few moments to share with you my most recent spring makes.
Shortly after my first daughter was born, a clerk at our local fabric store showed me a pattern magazine from Katia Fabrics. Now I gotta say I had never worked with their patterns before and had no idea they even existed but I decided to get the magazine anyway after skimming through it as I thought the designs were really cute. It was the spring/summer edition called « Essence ».
While I loved their designs, I never quite worked up the courage to sit down and figure out how the patterns/instructions worked as it seemed kind of daunting to me at the time. The magazine sat in my office for a good couple years, but I finally picked it up this spring and decided to give it a go.
To my great surprise, while they do work very differently than other more traditional patterns I’ve worked with before, I actually found their method very intuitive and picked it up right away.
The first design I tried was a jumpsuit, and I gotta say it is probably one of the cutest things I’ve ever made.

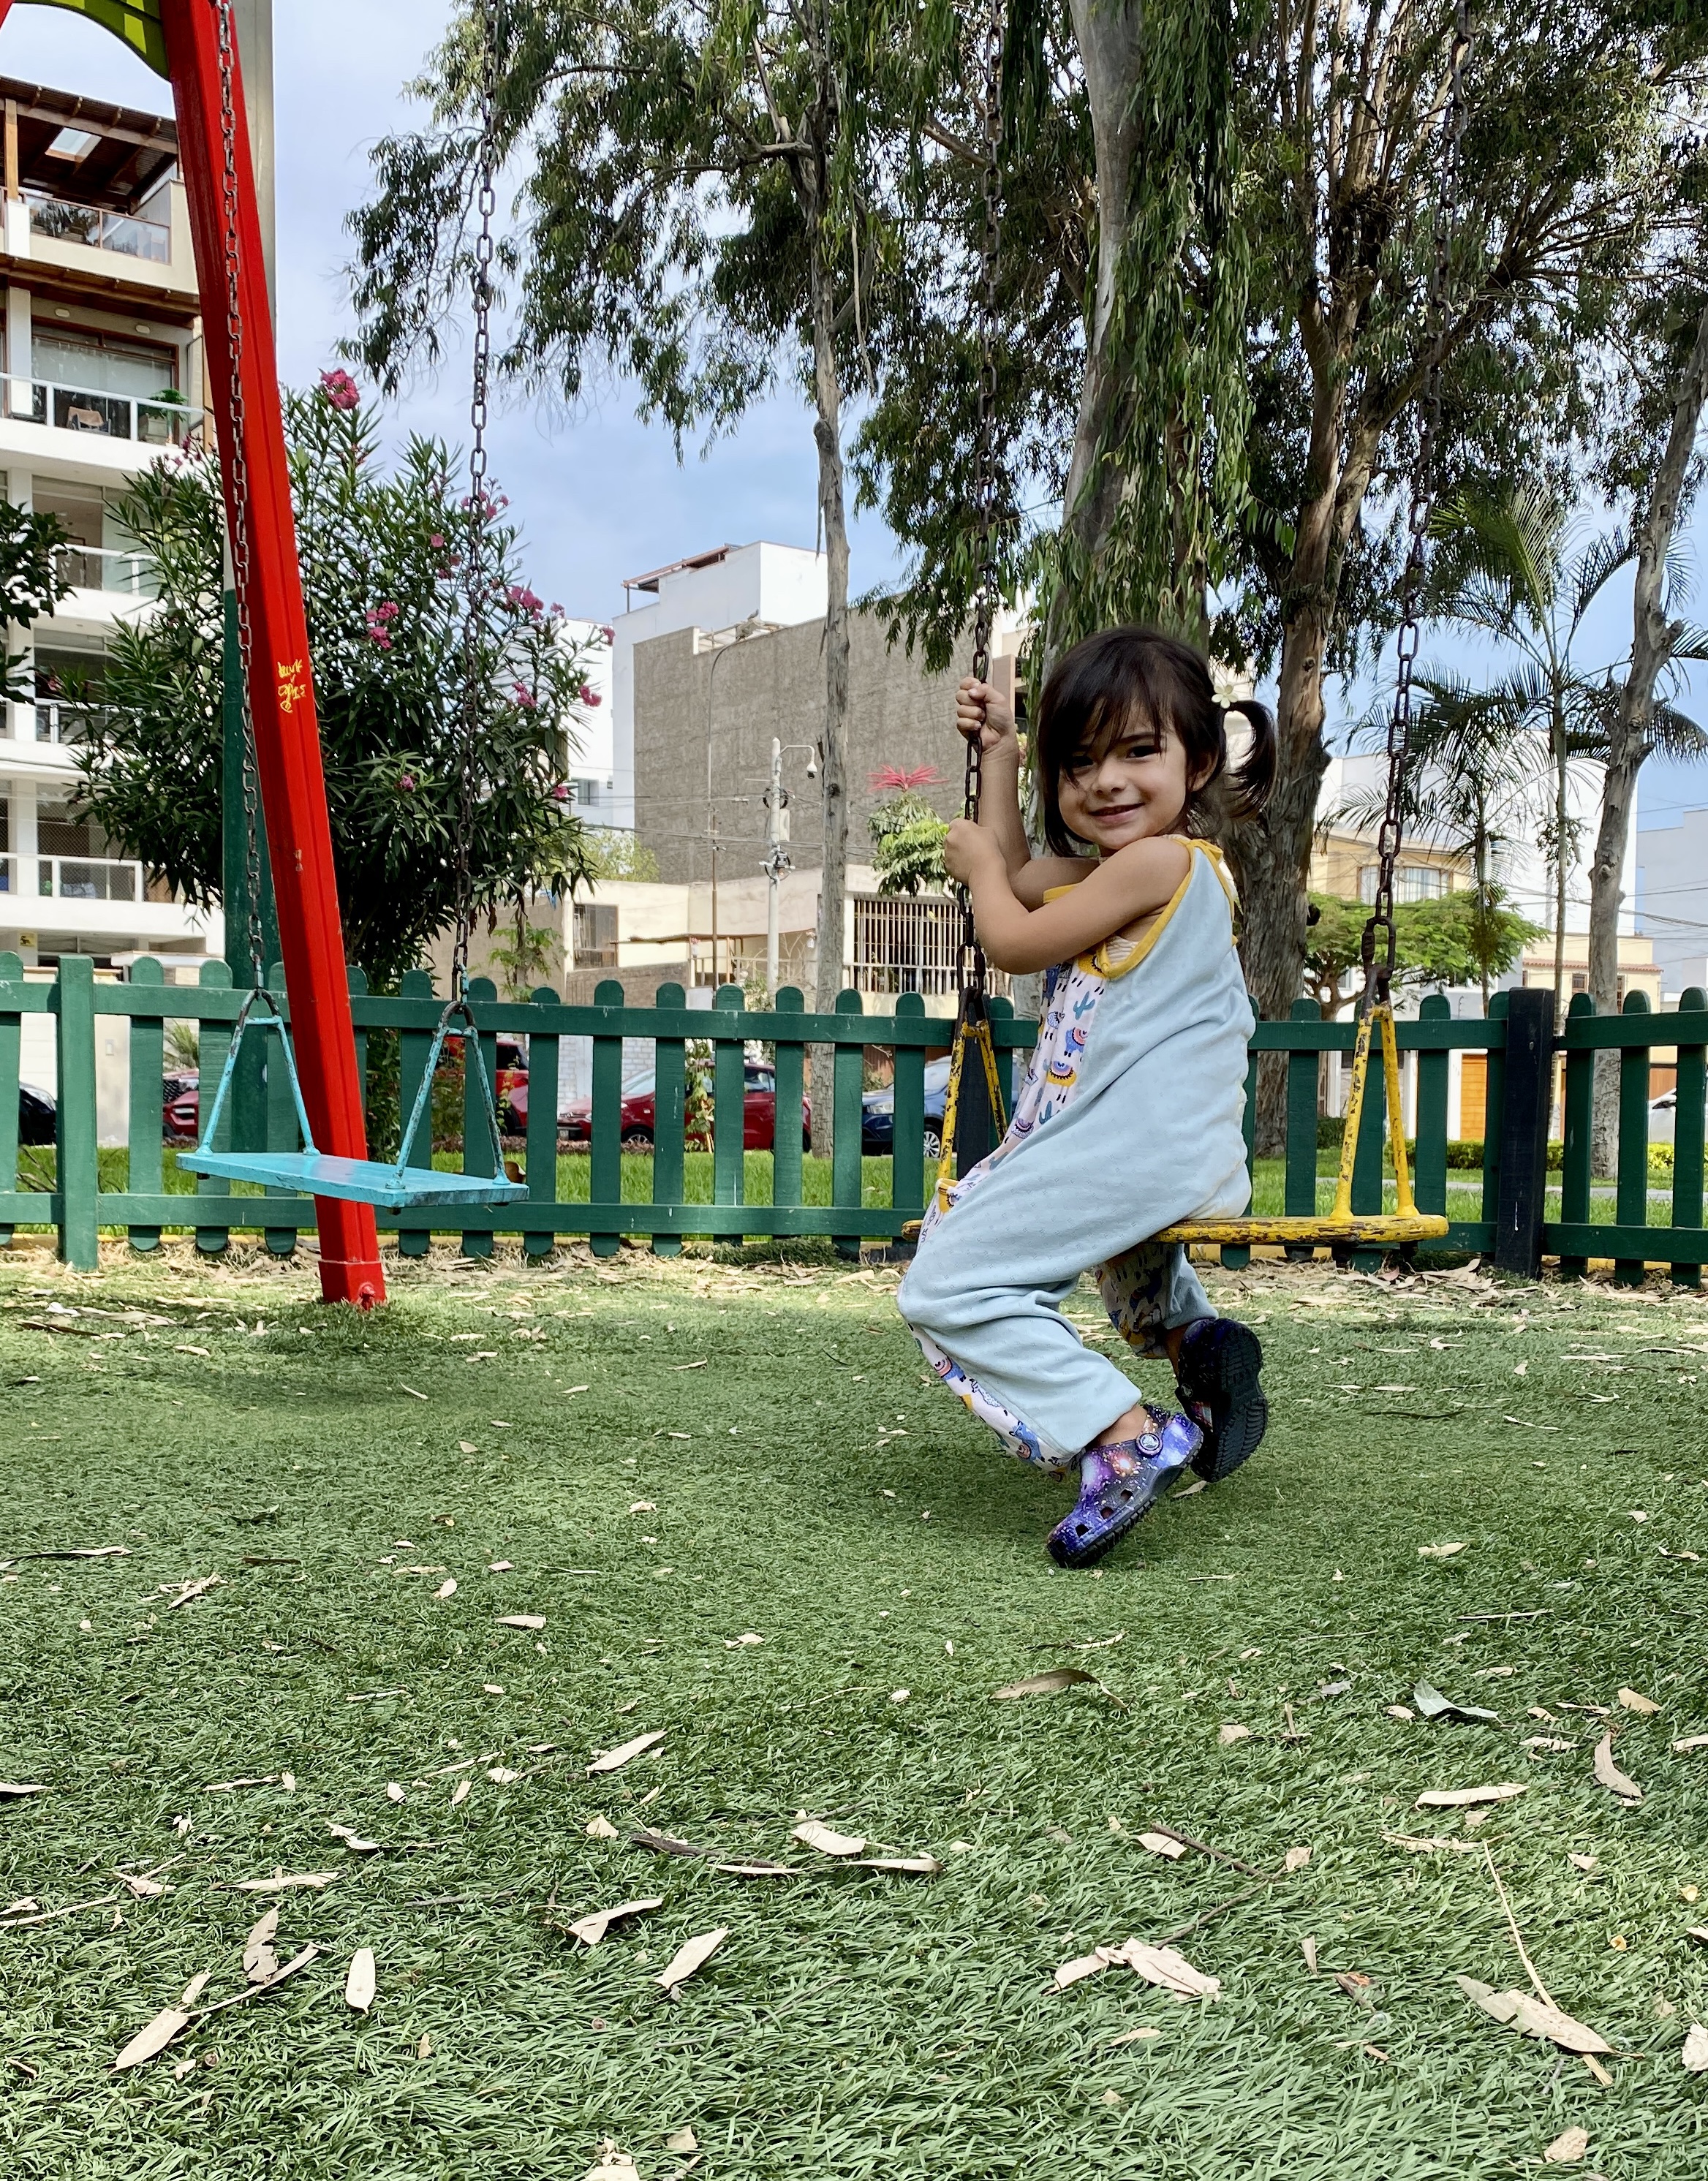
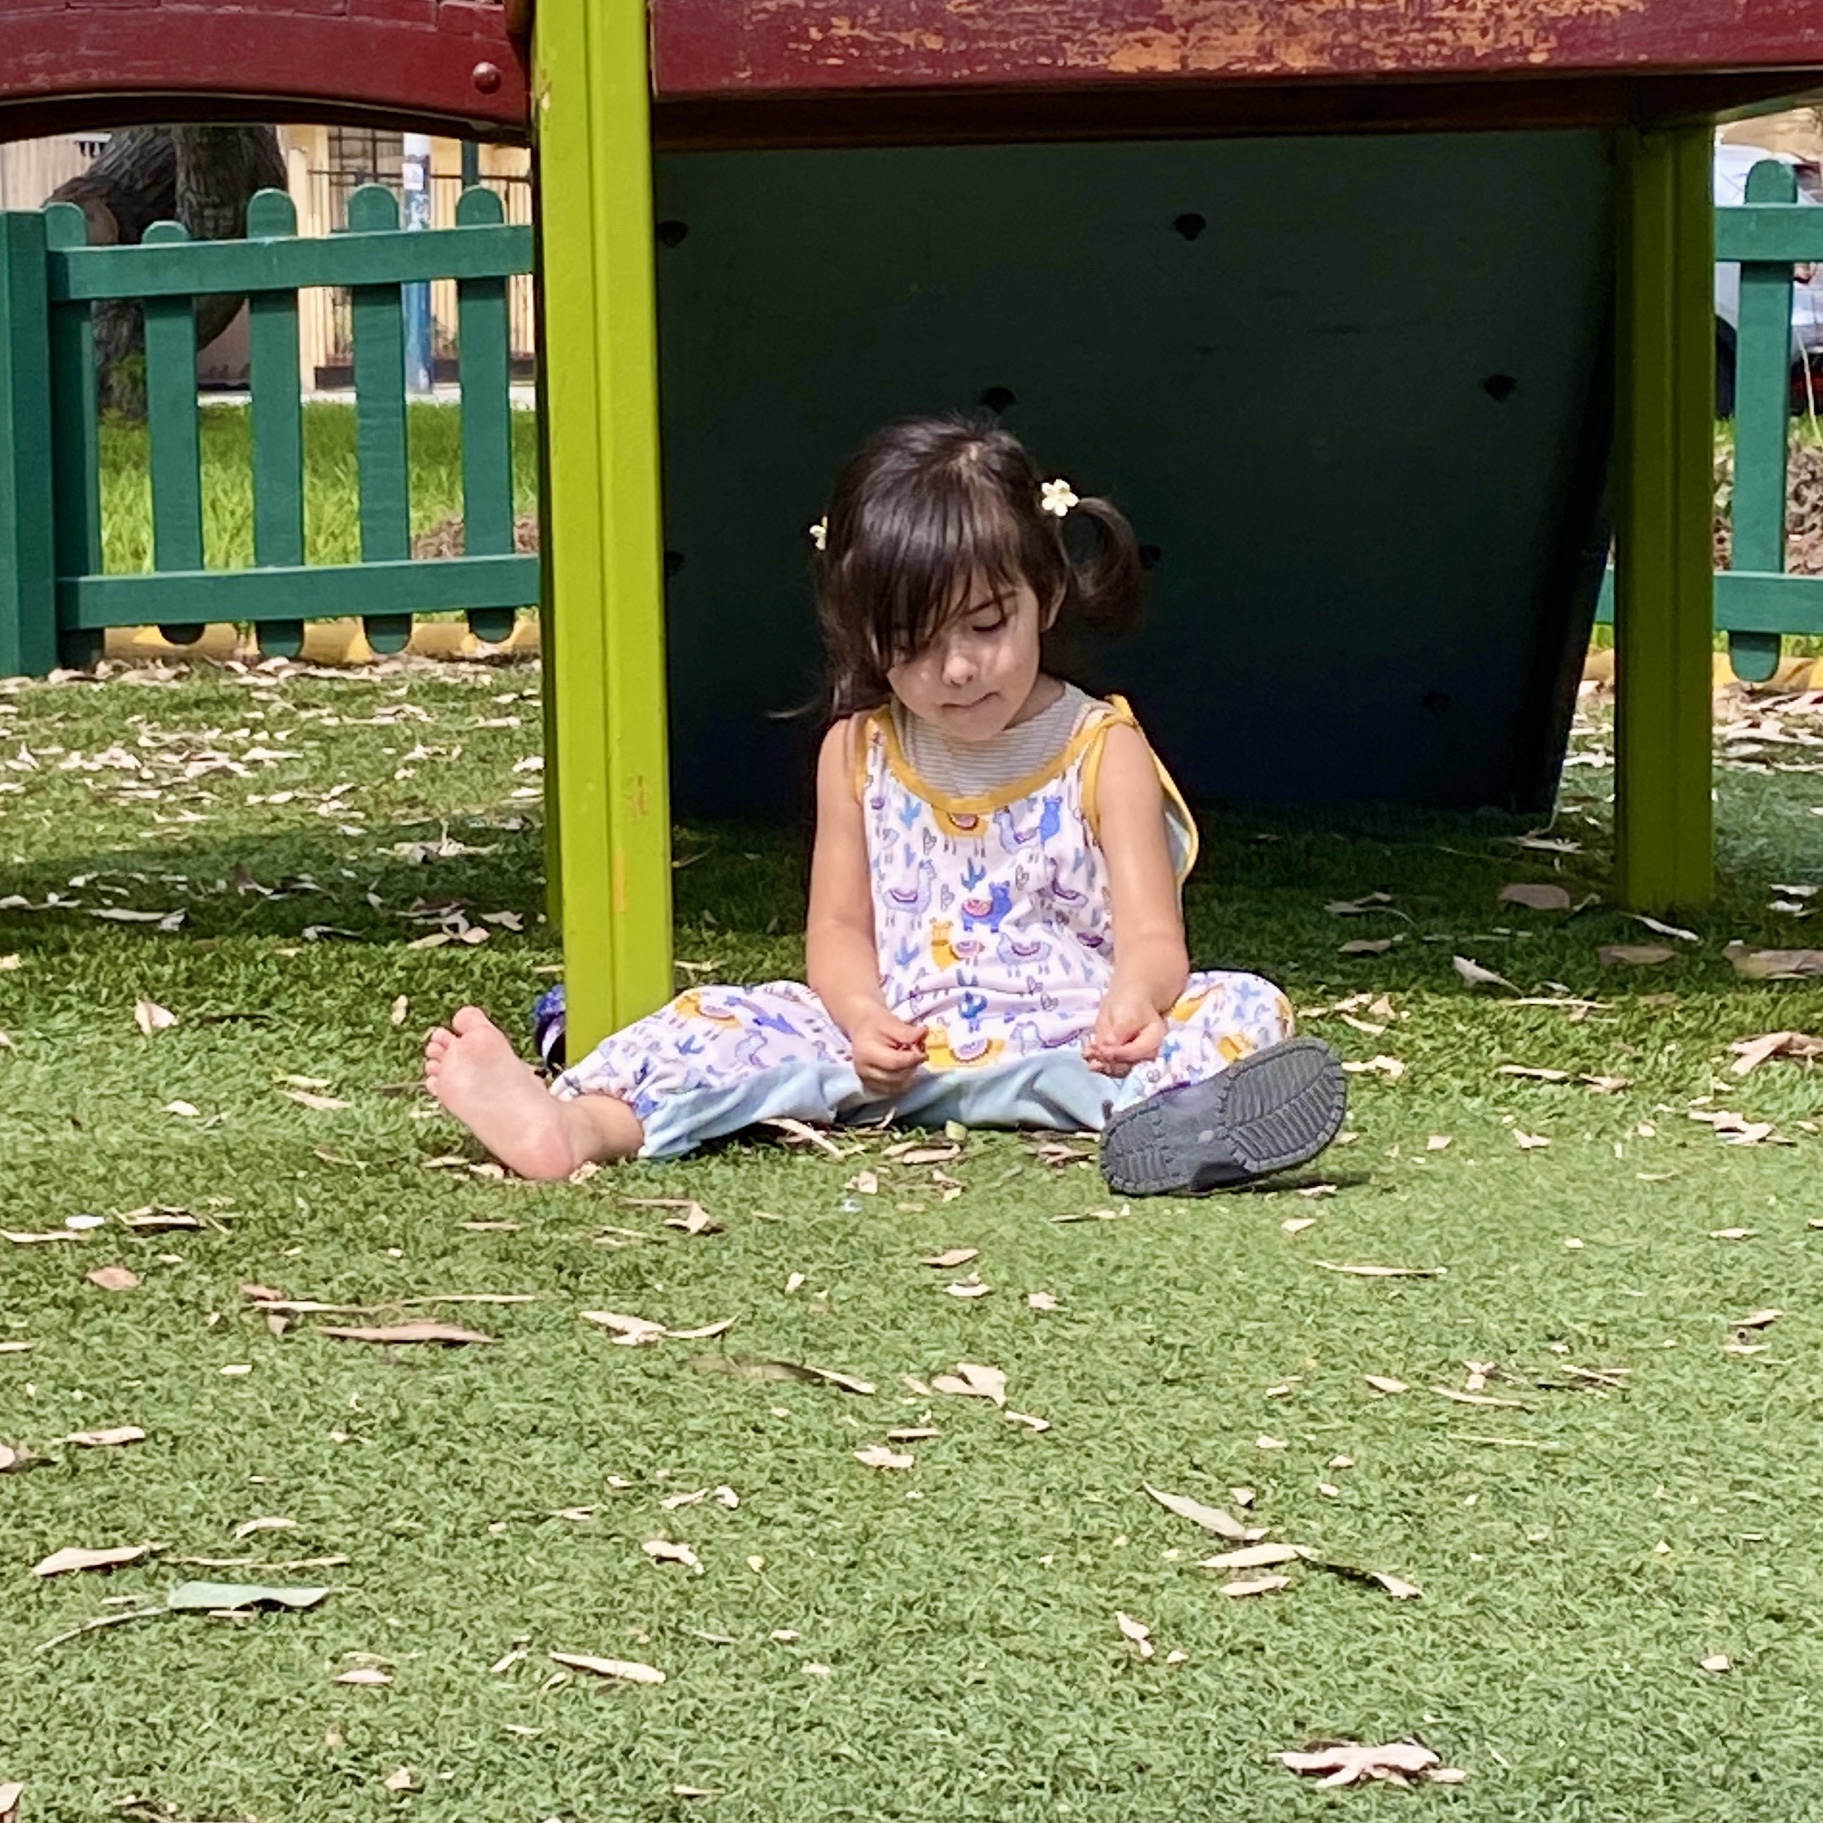

It’s the design #19 in the book. I made it exactly as is, I believe in size 98 cm (2-3 y/o?). The only mod I made was to use stretchy jersey fabric instead, in 3 different colours/patterns to make it more fun and lively. The design in cleaver, easy to put together and just so cute! the straps are a bit too long so i had to tie them up but this will fit for a LONG time!
I loved my experience with Katia Fabric’s pattern magazine so much that i ended up going to fabric store to buy another one, the fall/winter edition called “Textures”.
From this magazine, I made a sweatshirt (design #17) in a fun animal printed fleece.
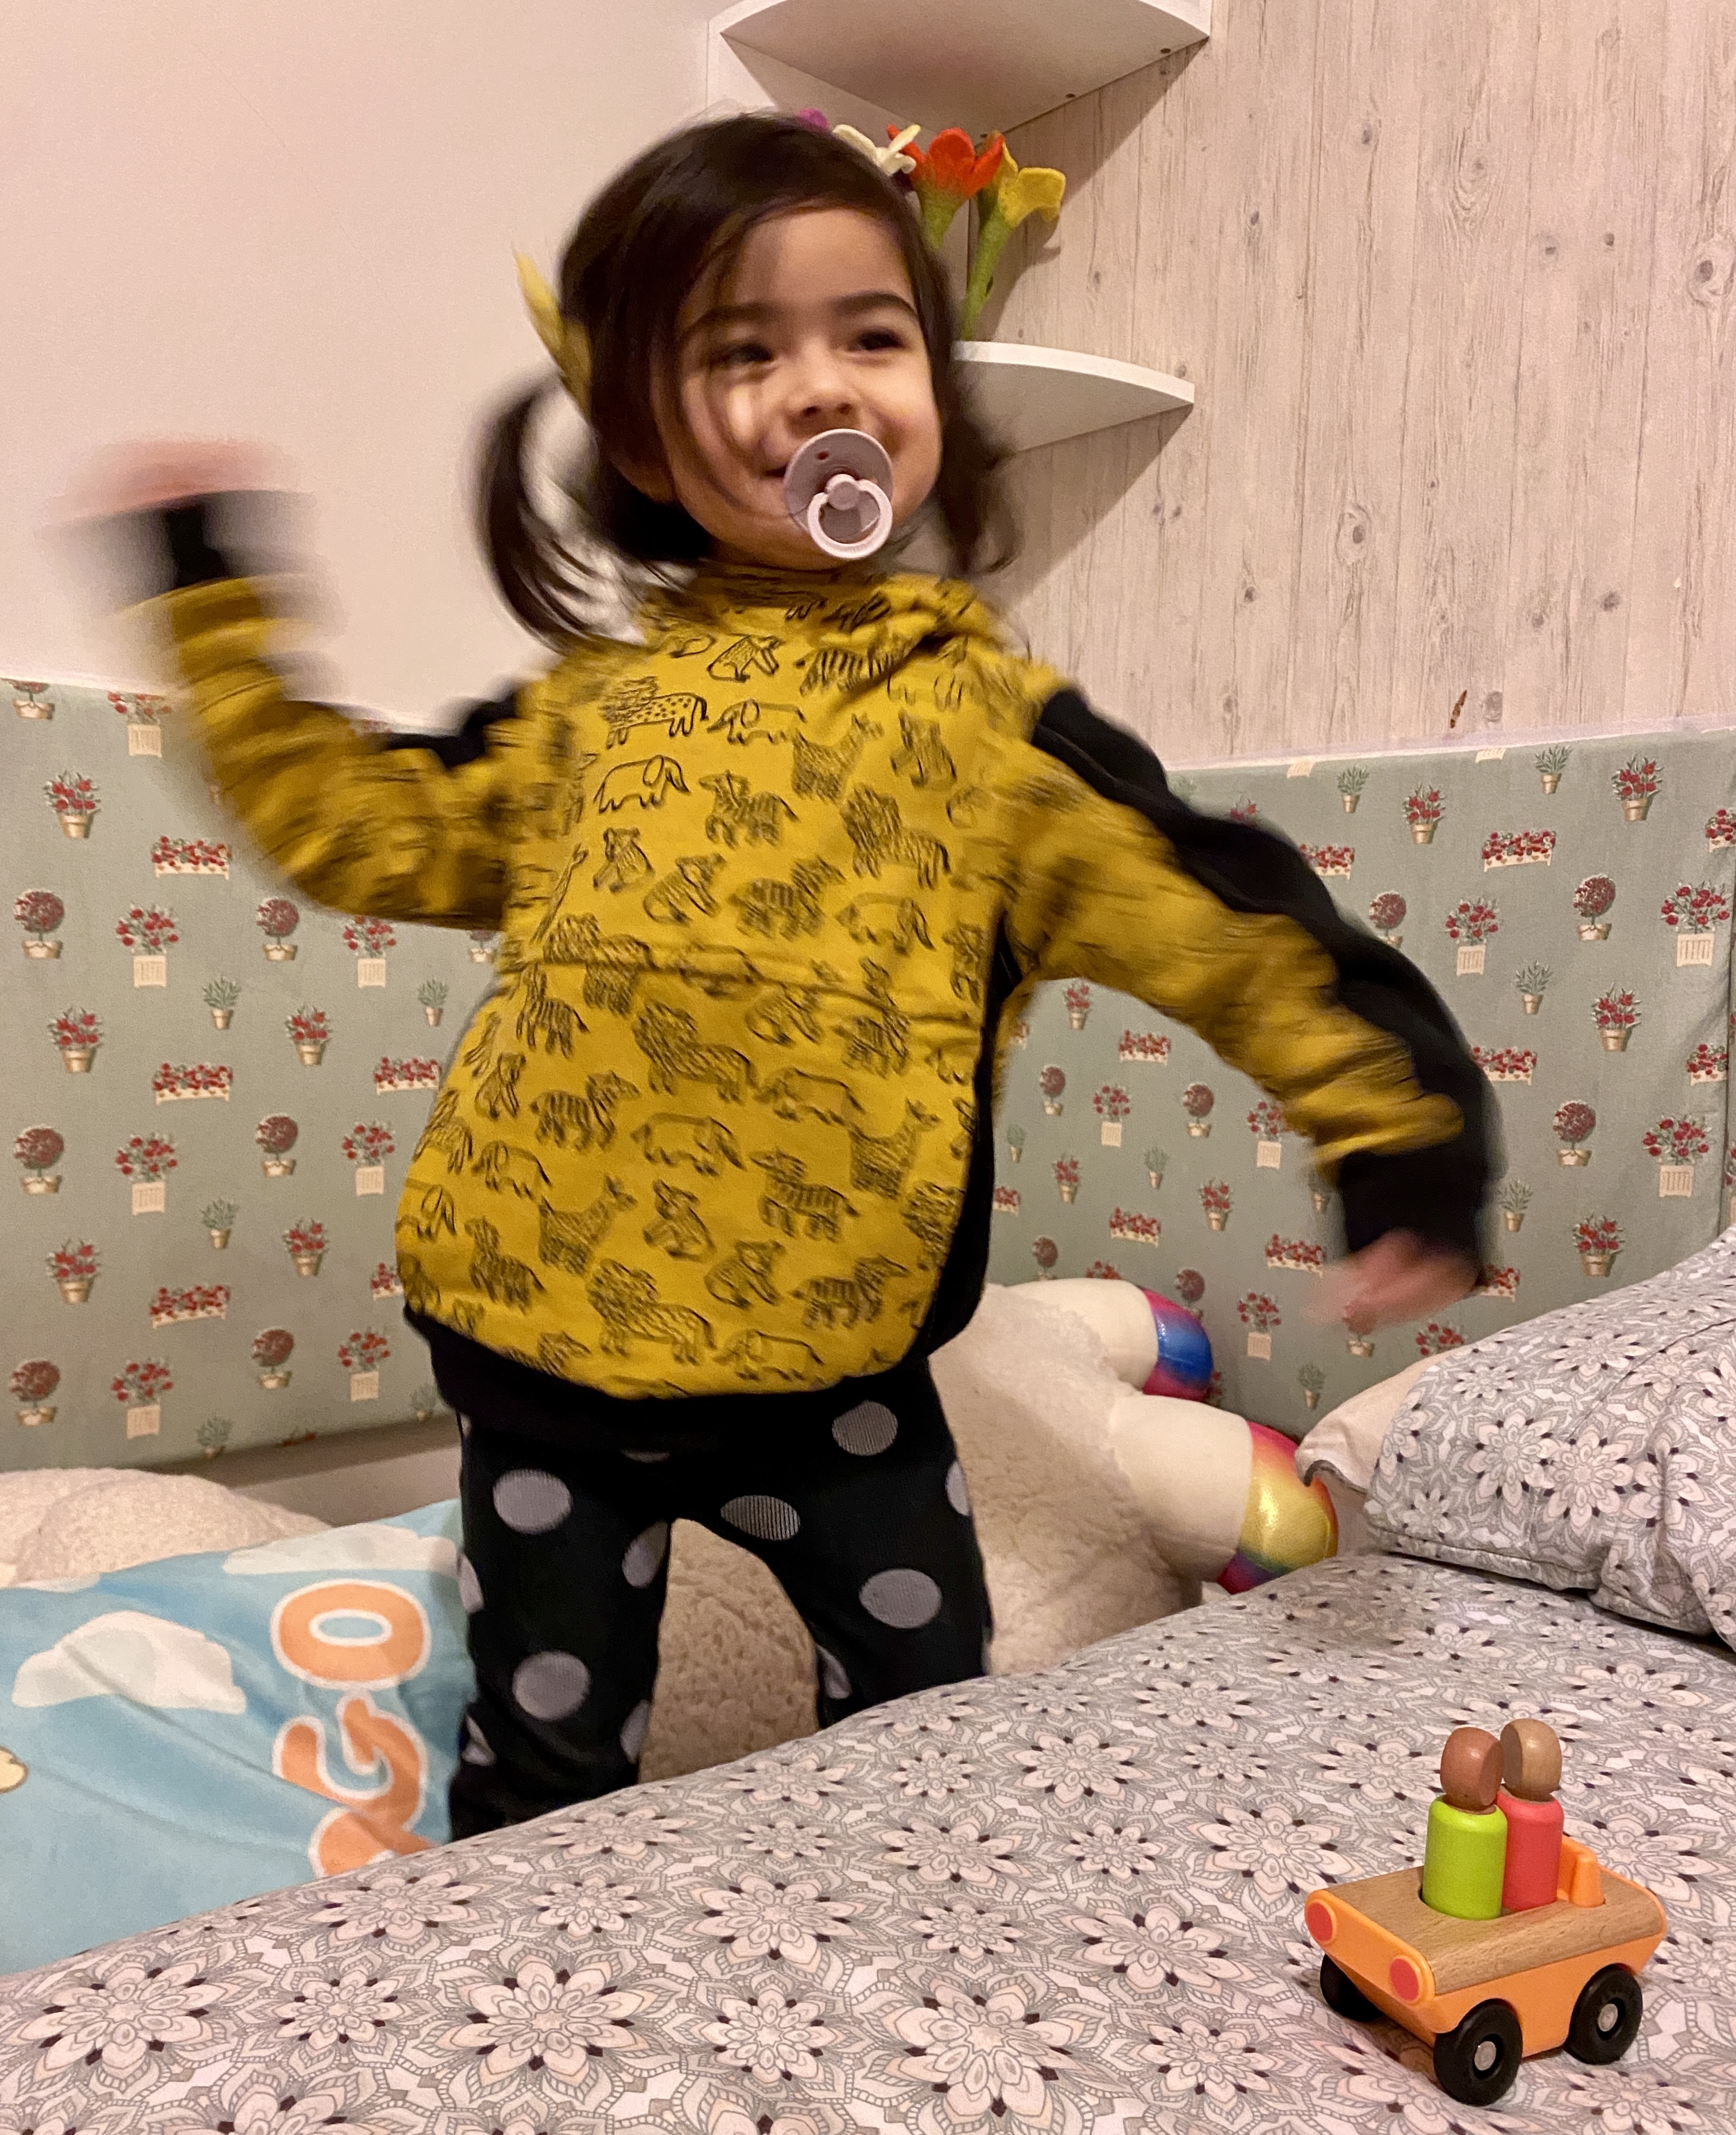
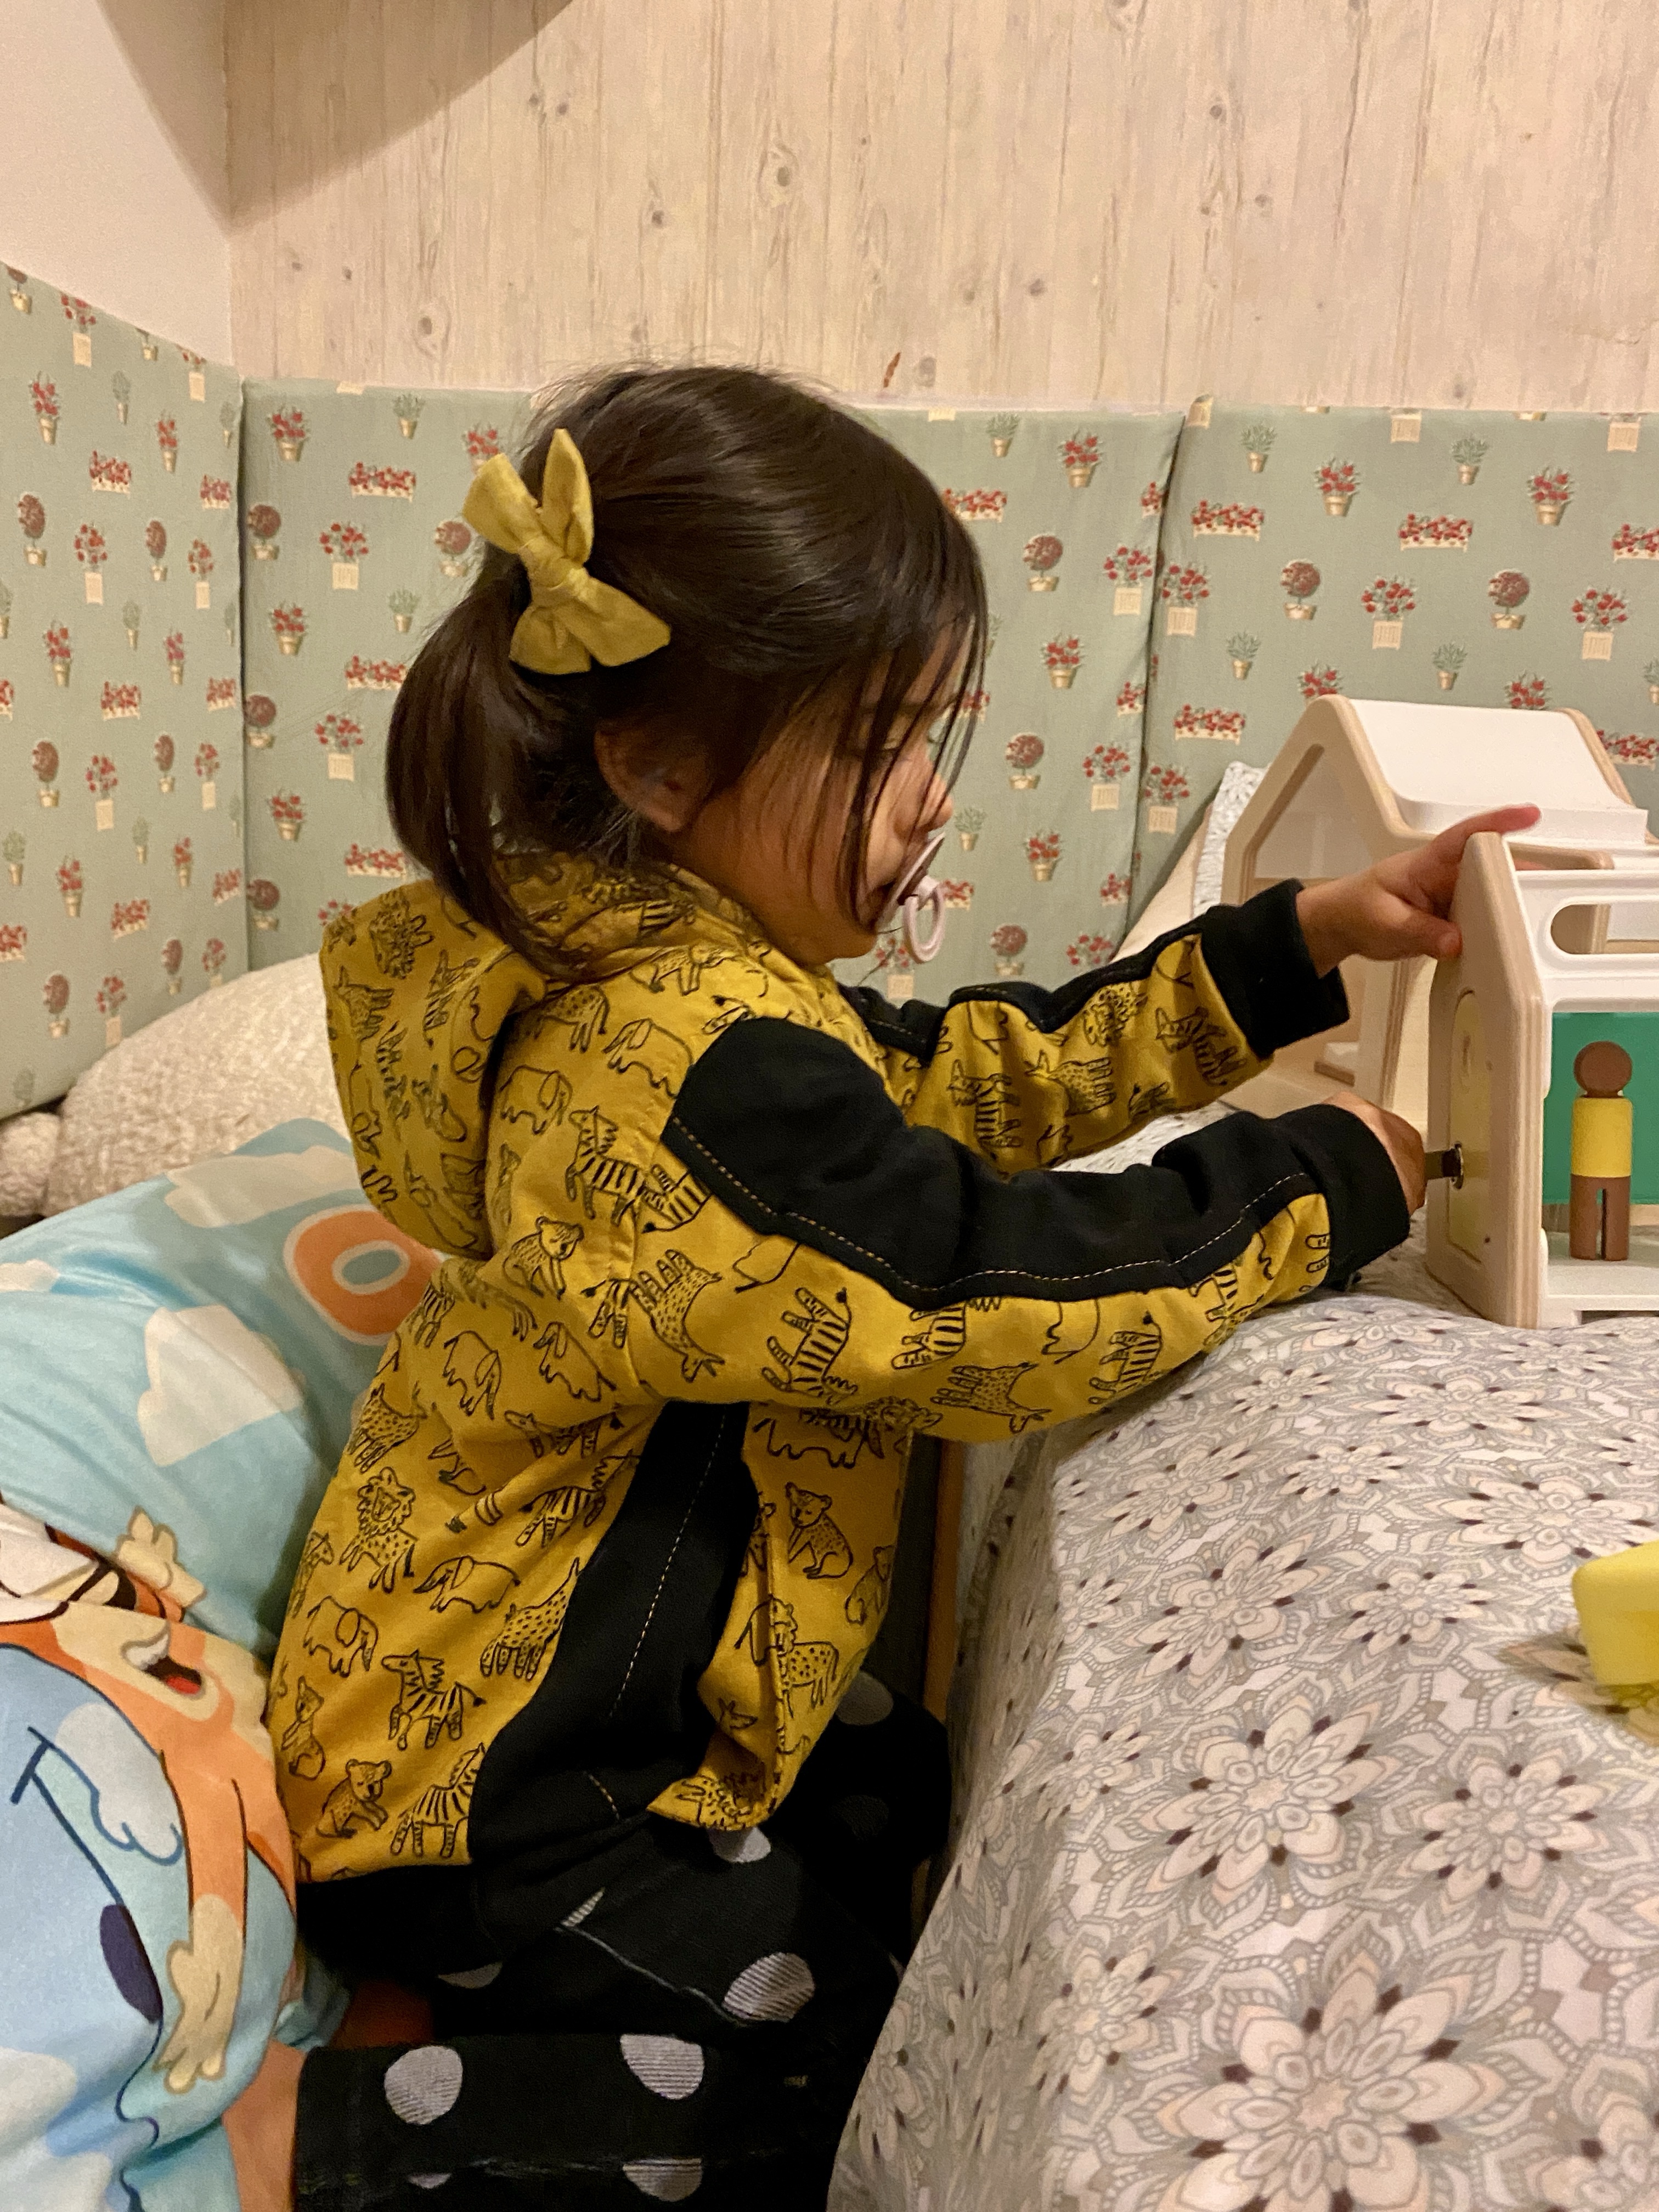
Again, I cannot express how clever, cute and easy to put together this design was. I love everything about it. The pockets, the hood, it is just perfect in every way.
My family and I will be enjoying the warmth and the sun for a little bit longer but soon enough, I’ll be back to share more spring and summer makes with you all.
Cheers 🙂
Maternity Makes
These past few months have been busy with all kinds of things, but as things slowly start to slow down for me, I wanted to share a few new pieces I sewed recently. As you’d expect from a now 37 weeks pregnant mama, the pieces I will share today were made with pregnancy and postpartum in mind.
The first one is like to share is another (is it my third now?) Heyday dungarees, from Waves and Wild. I made this one out of a very stretchy purple and yellow floral print my mom-in-law graciously sent me from Peru. While I don’t know the exact composition of the fabric, it feels very soft to the touch, it is matte and very very stretchy. I made the dungarees in size medium, and omitted the pockets to give all the space to the beautiful large floral print. I used encased seams with a top stitch for the body pieces, and normal seams for the straps, loops and hems.
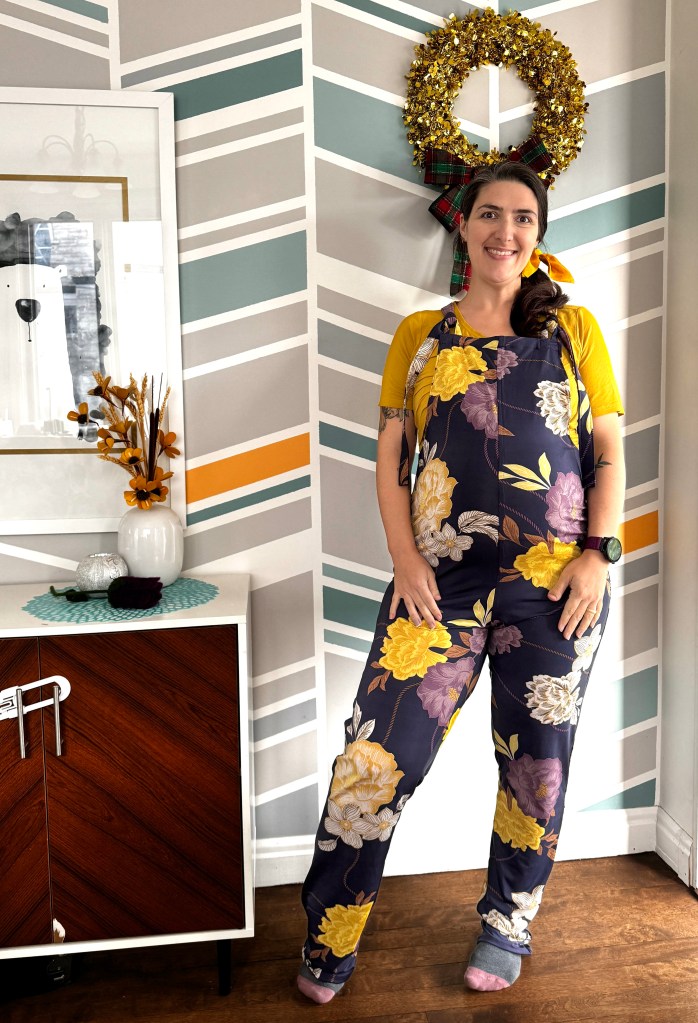
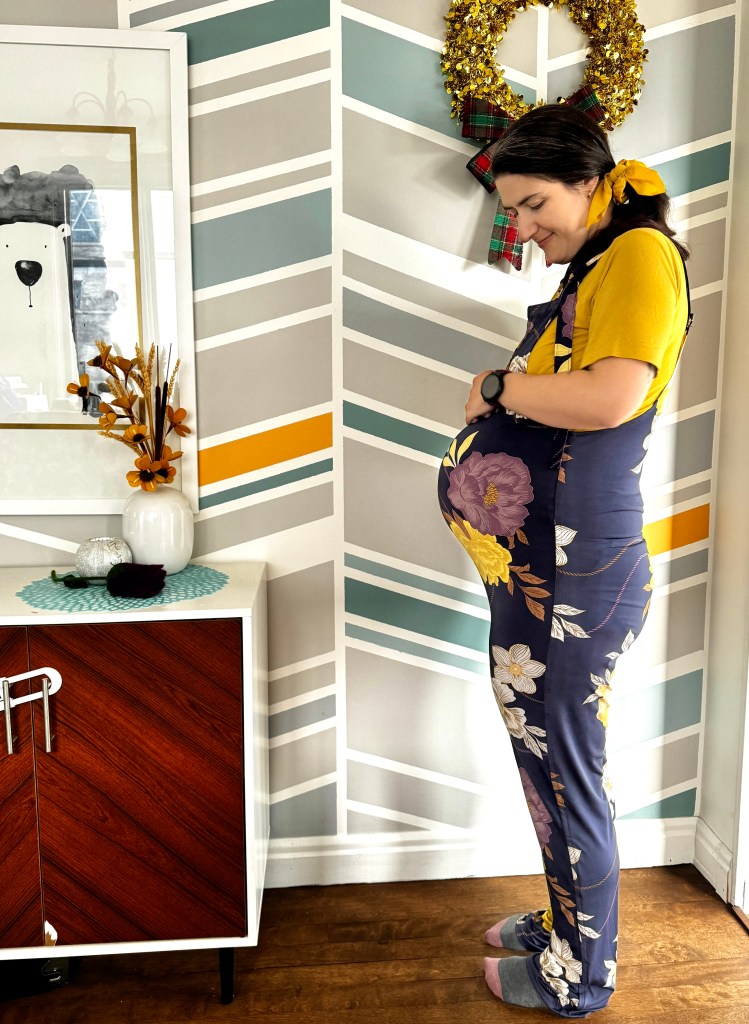

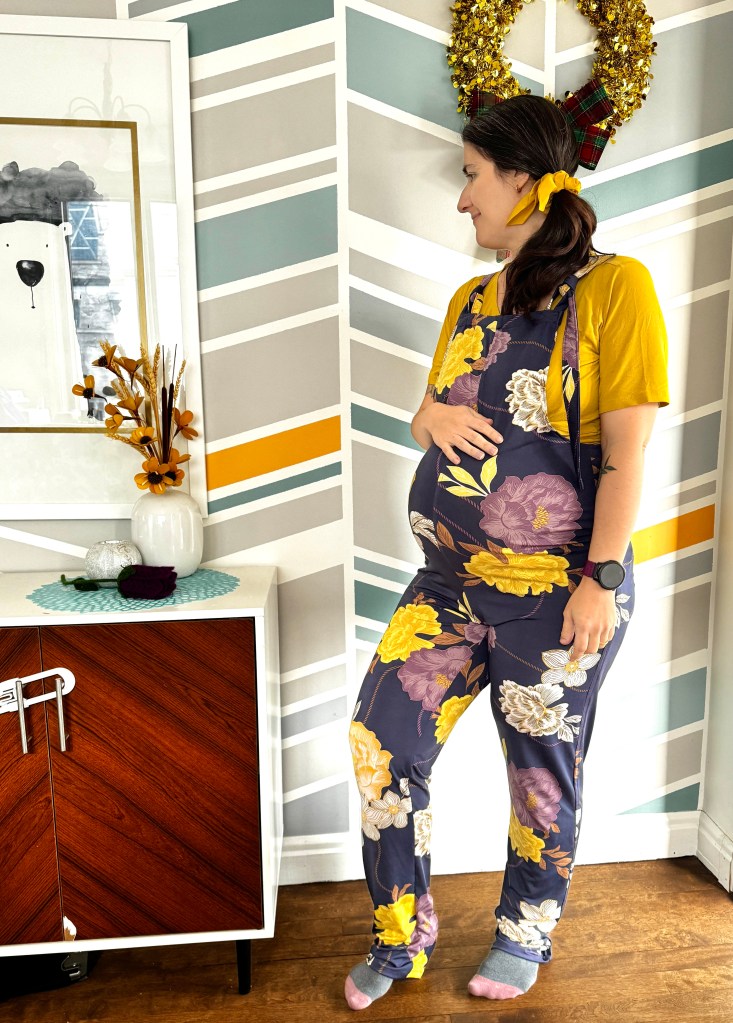
Because of the immense amount of stretch the fabric provides, I was actually able to size down to something that will fit me postpartum while still being able to accommodate my growing pregnant belly. And I am so happy with this piece, I cannot even begin to tell you! I will definitely get a lot of wear out of this, pregnant or not!
The second piece I wanted to show you today is this nursing friendly Lily Top from Sew Over It. With the two overlapping front pieces, it makes this top perfect for both pregnancy and postpartum, even when used with a non stretch fabric like I did here. The fabric I used is a vintage fabric from Germany I got from kleindermache through one of her fabric destash. I am not sure what the fabric composition is but it is very light and airy, which is why I thought it was perfectly suited for a sleeveless top. The pattern comes with both a cap sleeve and longer sleeve, but I opted for no sleeves at all and finished the edges with biais tape instead.
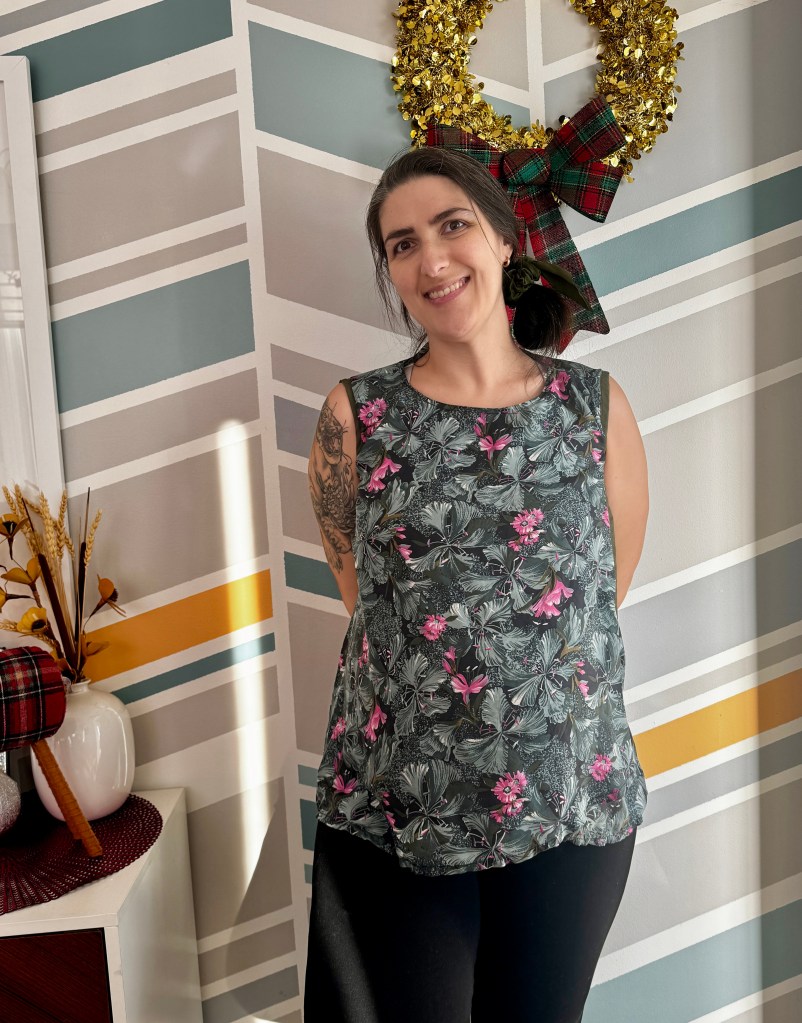
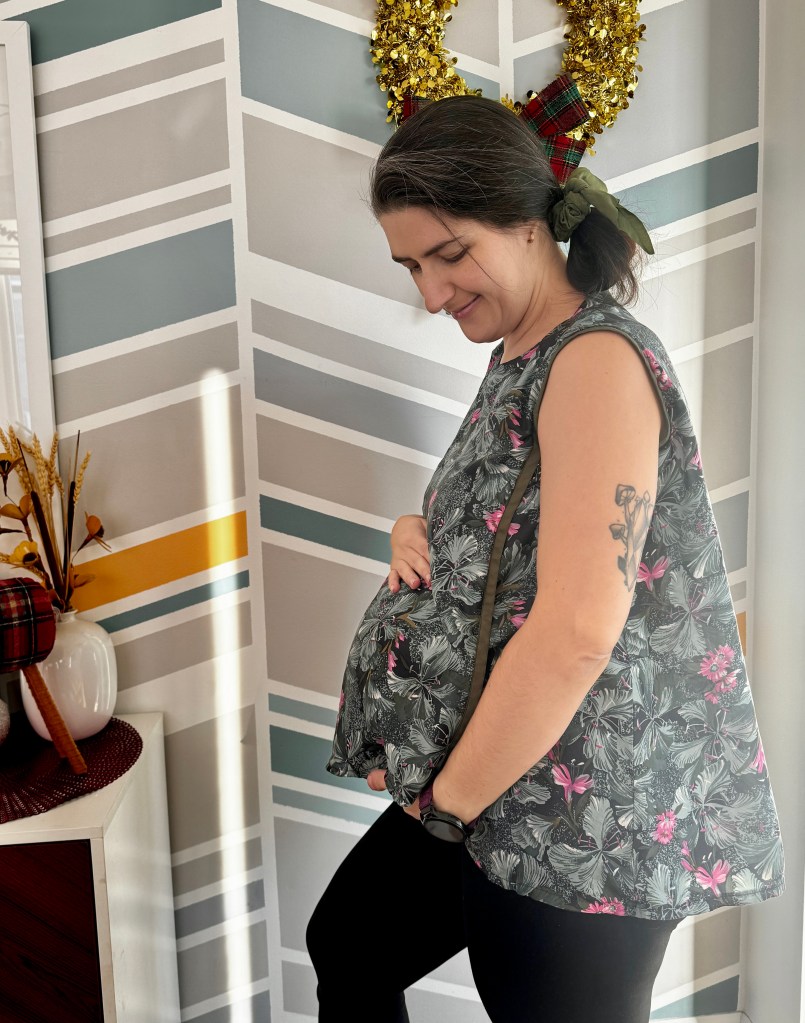
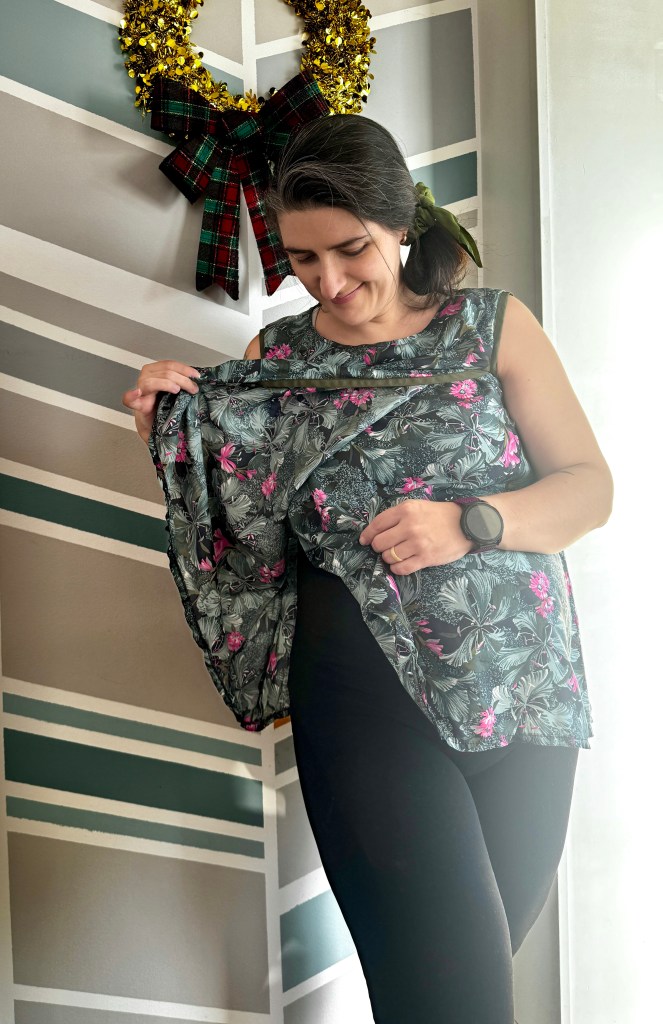
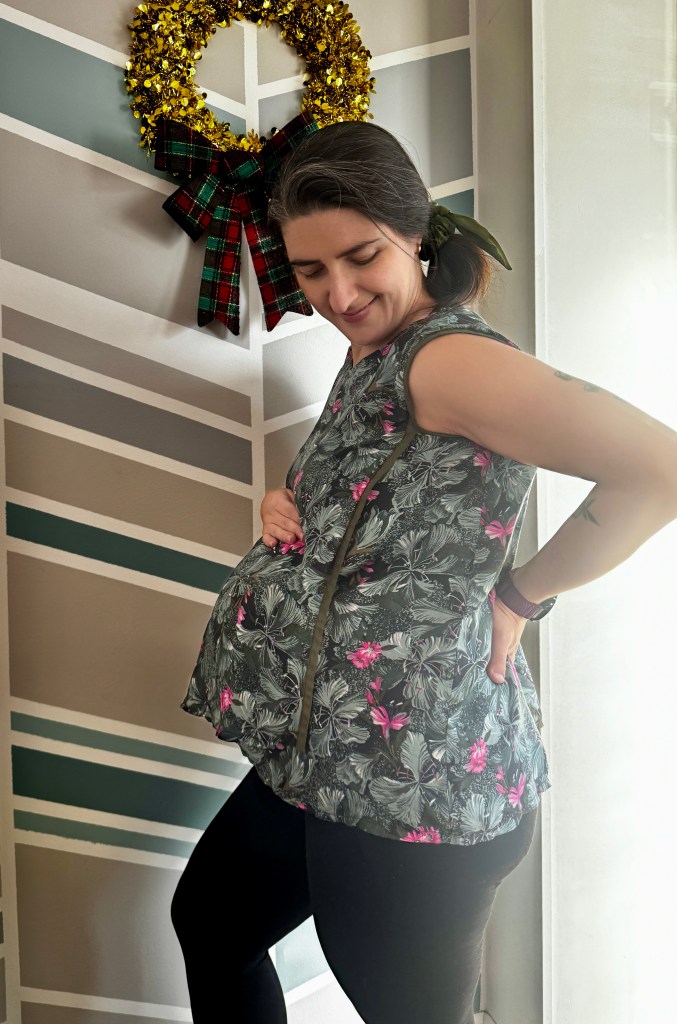

I love the colours and print of this fabric and I hope it will fit as well postpartum.
Small things
Holidays are right around the corner ans I’m so excited! My Christmas tree is already up. What about you? Somehow this year I skipped Halloween entirely and went straight to Christmas mood, and honestly I’m all in for it. The past few months have been a blur and I gotta say that very much I’m looking forward to a well deserved break.
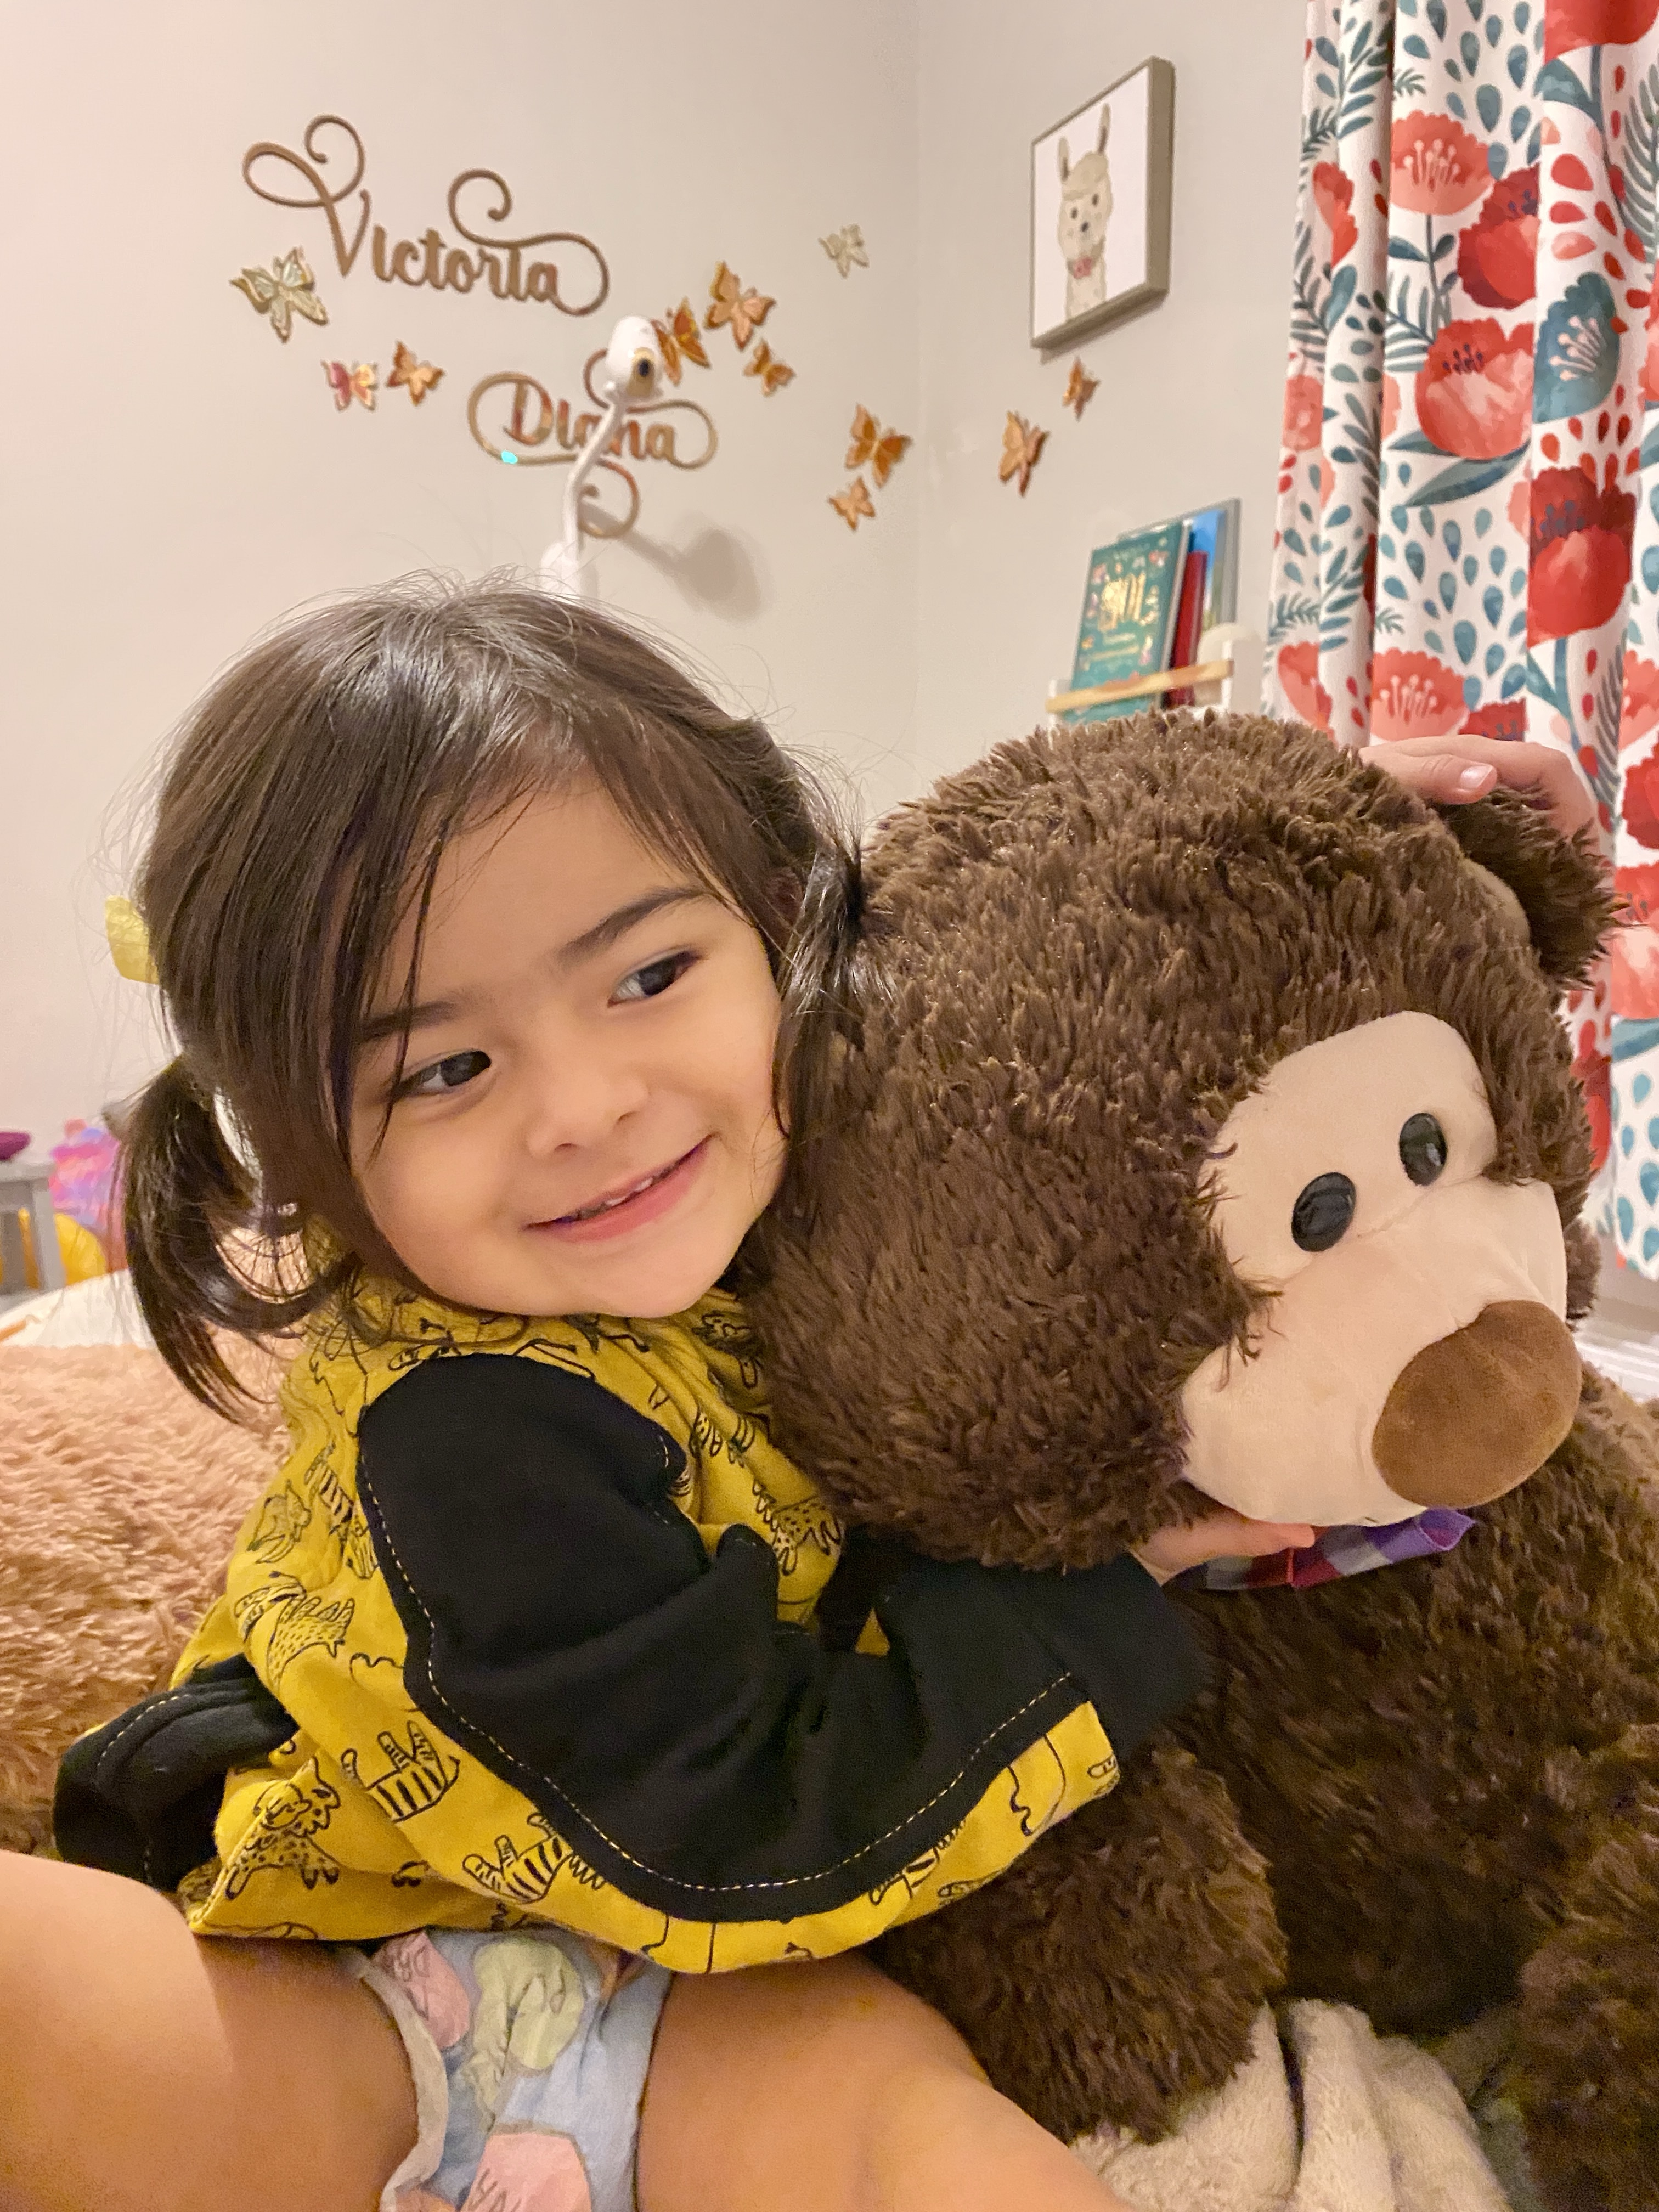
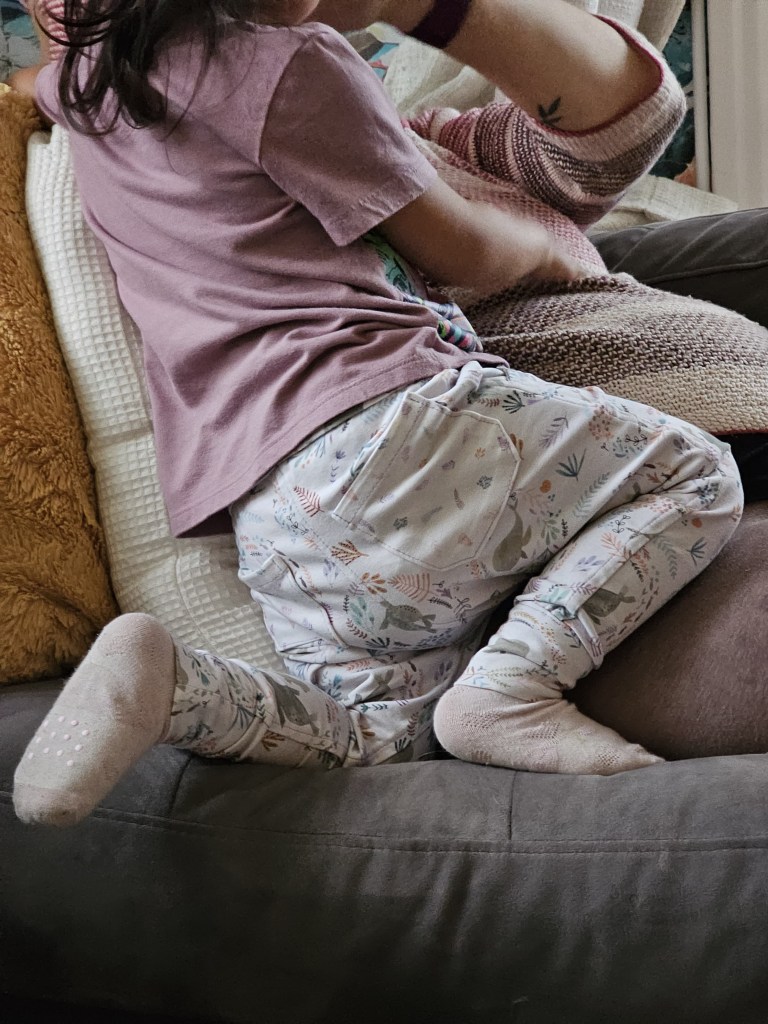
I haven’t had much time for crafting but did make a few small things – baby things that is. And I wanted to show them to you today. The set I’m showing you was made out of beautifully coordinated jersey print from Katia Fabric I bought a couple years ago when I was on maternity leave. It took me so long to finally get around to using it (life is busy you know!) but I’m just so glad I did. This fabric designed for kids comes in panels with 2 or 3 coordinated patterns you can use to make shirts, sweaters, dungarees or whatever else your mind can think of.
I opted for a simple sweater – pants combo as I felt that was the best way for me to use up as much of the fabric as possible. The shirt is a basic raglan top (you can head here for the FREE printable pattern from Jamie – Scattered Thoughts of a Crafty Mom) and the pants are the mini modern joggers from Brindille & Twig.
Both of them were made in size 2, and I mostly used encased seams for my sensitive daughter who doesn’t like tags, threads and seam allowances.
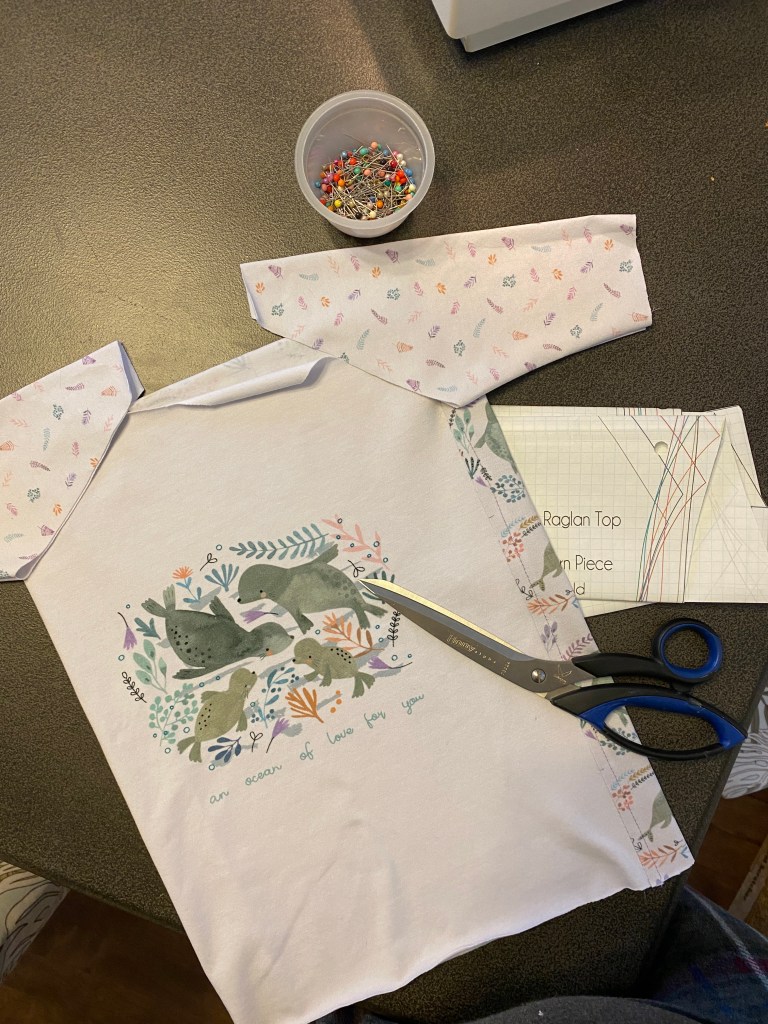
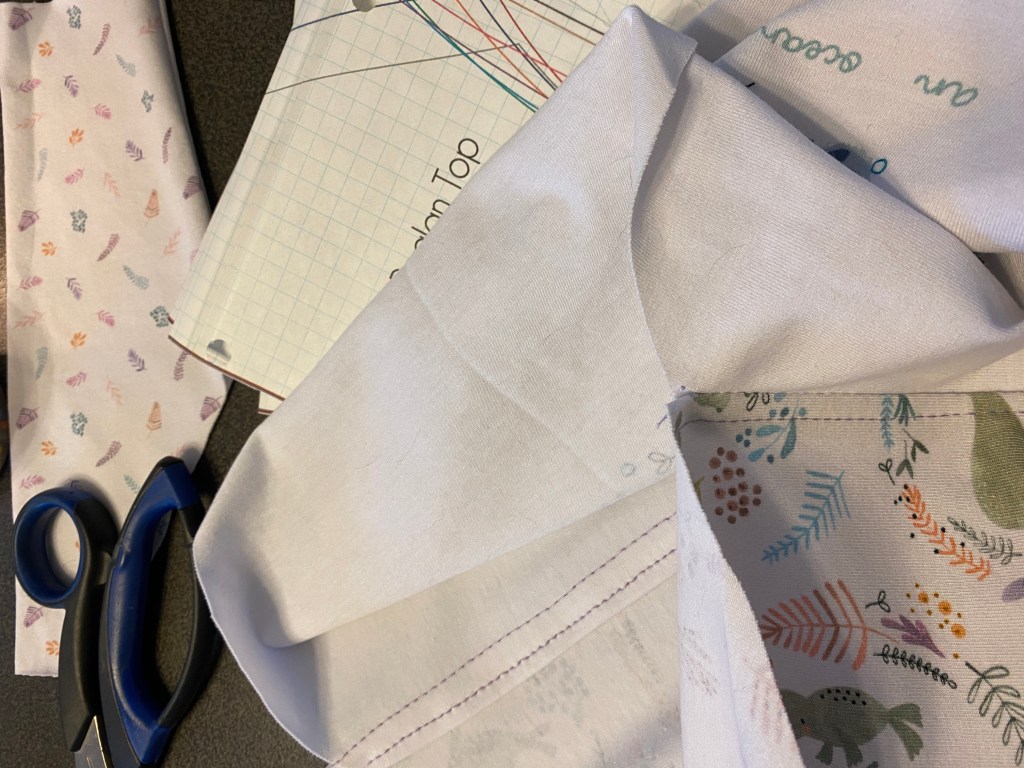

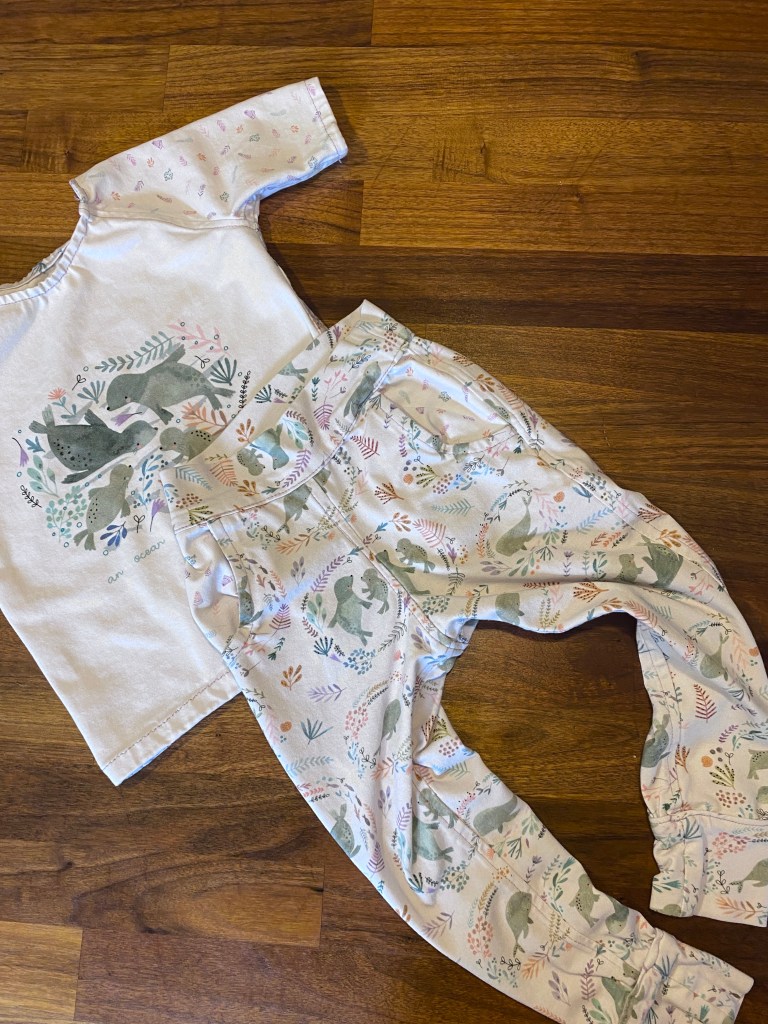
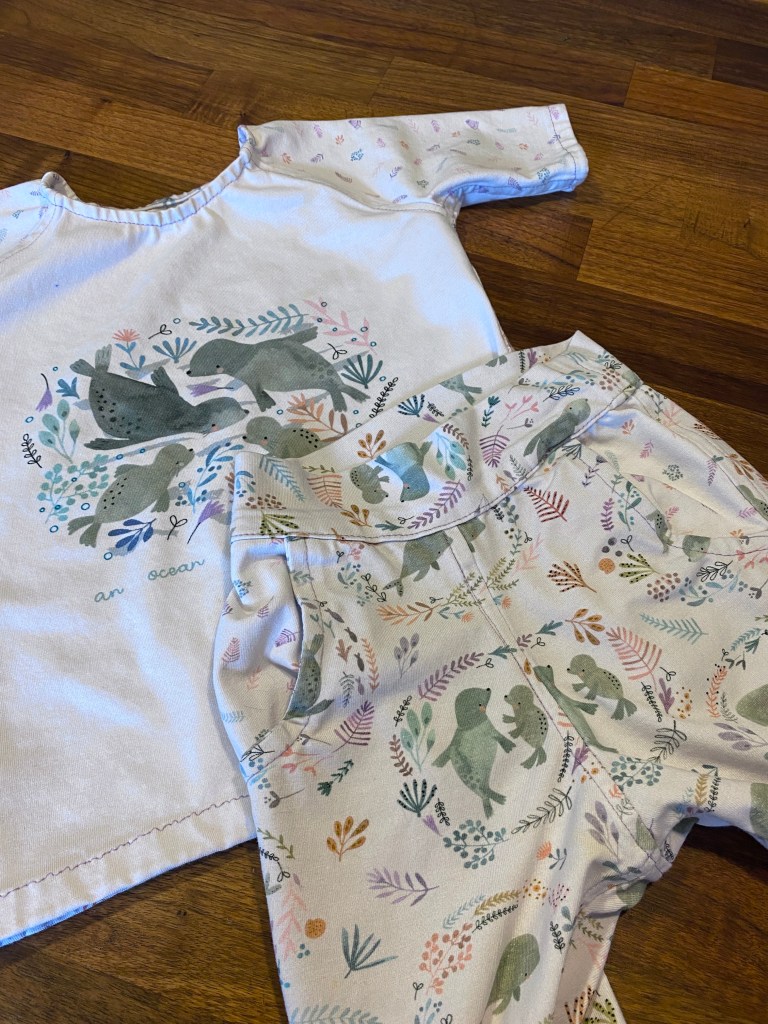

Aside from using encased seams instead of regular or overlock seams, I did almost everything as per pattern. The only small mods I made were to omit the neck binding on the raglan top and omit the knee patches and the drawstring at the waist on the pants.
My daughter absolutely loves this set, and I gotta say that I love it just as much. It is so adorable!
Lovely Spring
While it’s still snowing heavily here, the temperature has steadily been getting warmer, the days are getting longer and longer and every day the air feels more like spring – and let’s face it, it’s just so darn pretty!

Spring makes me want to clean things up and have a fresh start, and I somehow really wish I could start by clearing my office desk top! But nevermind that, instead I’ve been chugging along WIPs that have been hibernating for a tad bit too long in my craft room. First, I picked up an adorable cardigan called French Kiss from the lovely Anne B. Hansen that I started back in November as a test knit but couldn’t complete in time due to unforeseen circumstances both in my personal and professional life. I finished the body (that I made considerably longer that the pattern called for) and I am now about halfway through the first sleeve. If I can keep things going at this pace, I should have this cardigan completed before the end of the month. Yay! Fortunately for me, I’ve been getting a lot of (feline) help and support along the way.

Secondly, I tidied things up around my sewing room and worked on a bag I made many, many years ago that needed fixing and put together 3 new additions : 1 reversible tote bag and 2 multi-way asymmetrical fold over clutches, that I find absolutely adorable.


As always, the reversible tote bag was made using my trusted Kwik Sew K3700 pattern, but for the little fold over clutch/tote bag, I didn’t use a pattern. I wanted to make an envelope clutch that could unfold and be used as a tote when needed, so I decided to put pen to tracing paper and figured it out myself. There’s the main bag compartment that has 2 little pockets on the inside (one zippered, one sewed over the lining) and there’s another compartment on the front, where the clutch folds over, inside of which there’s another pocket sewed onto the lining. There’s also 2 sets of D rings to attach the strap for the full size or the half size, and two different straps to use – one wrist lanyard and a full size adjustable strap. All of them feature small hooks to be detached and reattached where needed.
Although I love the final result, I struggled a bit to install all those zippers (there’s 3 per bag, folks!!!) the right way. Ok, I’ll admit it – there’s a zipper I had to rip and reinstall twice because it was installed inside out. Urgh! But you wouldn’t make fun of me for that, now, would you ? 🙂
Gearing up
Three full weeks after getting back from Hawaii I’m still on a sunshine high, and the current heat wave brushing over New England and Quebec probably has something to do with that. While we enjoy this year’s last summer outbursts, I’m slowly preparing for fall and gearing up for the upcoming holiday season. Since I make most of the presents I offer, makes perfect sense, right?
And this shawl is the first of the season, it’s a free pattern called Glitz at the Ritz from Helen Stewart. I used one skein of Malabrigo sock yarn in the “Solis” colorway and 1 package of blue/green glass beads from Walmart.

It was my first time actually making a beaded project, and I must say that I’m quite satisfied with the result. I’ve always avoided beaded projects because I thought the beading would slow me down significantly, but it turns out it’s really not that bad, I should have given it a try much sooner. I really liked the pattern, it was simple, straightforward and the instructions were clear. I worked the entire pattern as is, except that I omitted the beads in the star lace section partly because I didn’t want to have to open the second bead package, and partly because I was straight out lazy, but I’m actually quite glad I didn’t because I think it looks beautiful as is – I feel like the beaded and plain sections play very well together and provide a good balance. As usual you can find all the details on my project page, so head over there for pattern and yardage information.
Over the summer I also made a few more reversible tote bags using the Kwik Sew pattern K3700. I’m really, really growing fond of this pattern because I think it’s really versatile – you can make it reversible or not, on a serger or on a regular sewing machine and the shape of the bag is perfect to be used as a handbag, a project bag or a shopping bag, as you see fit. In both cases, I also had enough fabric to make a matching notion pouch with a zipper, that can be used with the bag or independently. Really, this might become an addiction in the near future.

So what’s on your needles, folks?
Carnage and Destruction
For 3 or 4 weeks now, we’ve been living in complete chaos at the house because I decided to undertake a major project – painting the kitchen. This may seem like a menial task for some of you, but I can assure you that we have experienced anything but. Thing is, our kitchen isn’t very big but it’s packed, the cabinets are painted and the entire room is nothing but corners, trim and moldings (ceiling included!). Add to that the fact that we just bought a giant 80” long kitchen table and that I opted for a 3 color scheme for the walls&ceiling and you’ll quickly understand it was simply impossible to paint everything at once so I’ve had to proceed in sections, moving the furniture and the stuff as I go so it’s been slow but steady progress in the last few weeks. I still have to paint the cabinets but things are working out fine, and I’m really excited to see it come together.
Since I’ve been painting quite a bit at home recently (it’s the third room being painted since this fall) my craft room has been doubling as a storage room for quite some time now, so we could get the furniture out of the way while we were working on the other rooms. Since things are finally starting to clear up a bit, I’ve had a chance to tidy things around in this room for the first time in months, and I took this opportunity to use up some small fabric remnants or finish projects I started a very long time ago.
Among other things, I made a cute baby wrap for a friend who recently gave birth

There’s also a cute little lunch bag with a bee cotton print and a large, reversible tote bag made using the Kwik Sew pattern K3700 and some remnants I had in stash. This tote has a really nice shape and feels nice on the shoulders, and the pattern is actually really cool because it provides instructions to build these bags directly on a serger, both with apparent and hidden seams.

I also made a couple new placemats to fit into the new kitchen and the fabric might give you a hint as to which color I’ve used to paint a portion of the walls. I’ve actually had the fabric cut and prepped for those placemats for so many years now because it was left over from a set I made for my dad and his wife. I made them a set of 6, but there was fabric left over for 2 more placemats, that I never sew together because I didn’t want to offer someone an incomplete set. Since there’s only me and my husband at home right now though, I figured I might as well give it a shot, especially since the leafy green fabric is so pretty!

Well that’s it for now folks, wish you all a fun-filled summer 🙂
More Dresses. Really?
Well, ok… I guess I’ve been re-garnishing my wardrobe lately. I added three fun dresses to my wardrobe in the past few weeks, and here they are.
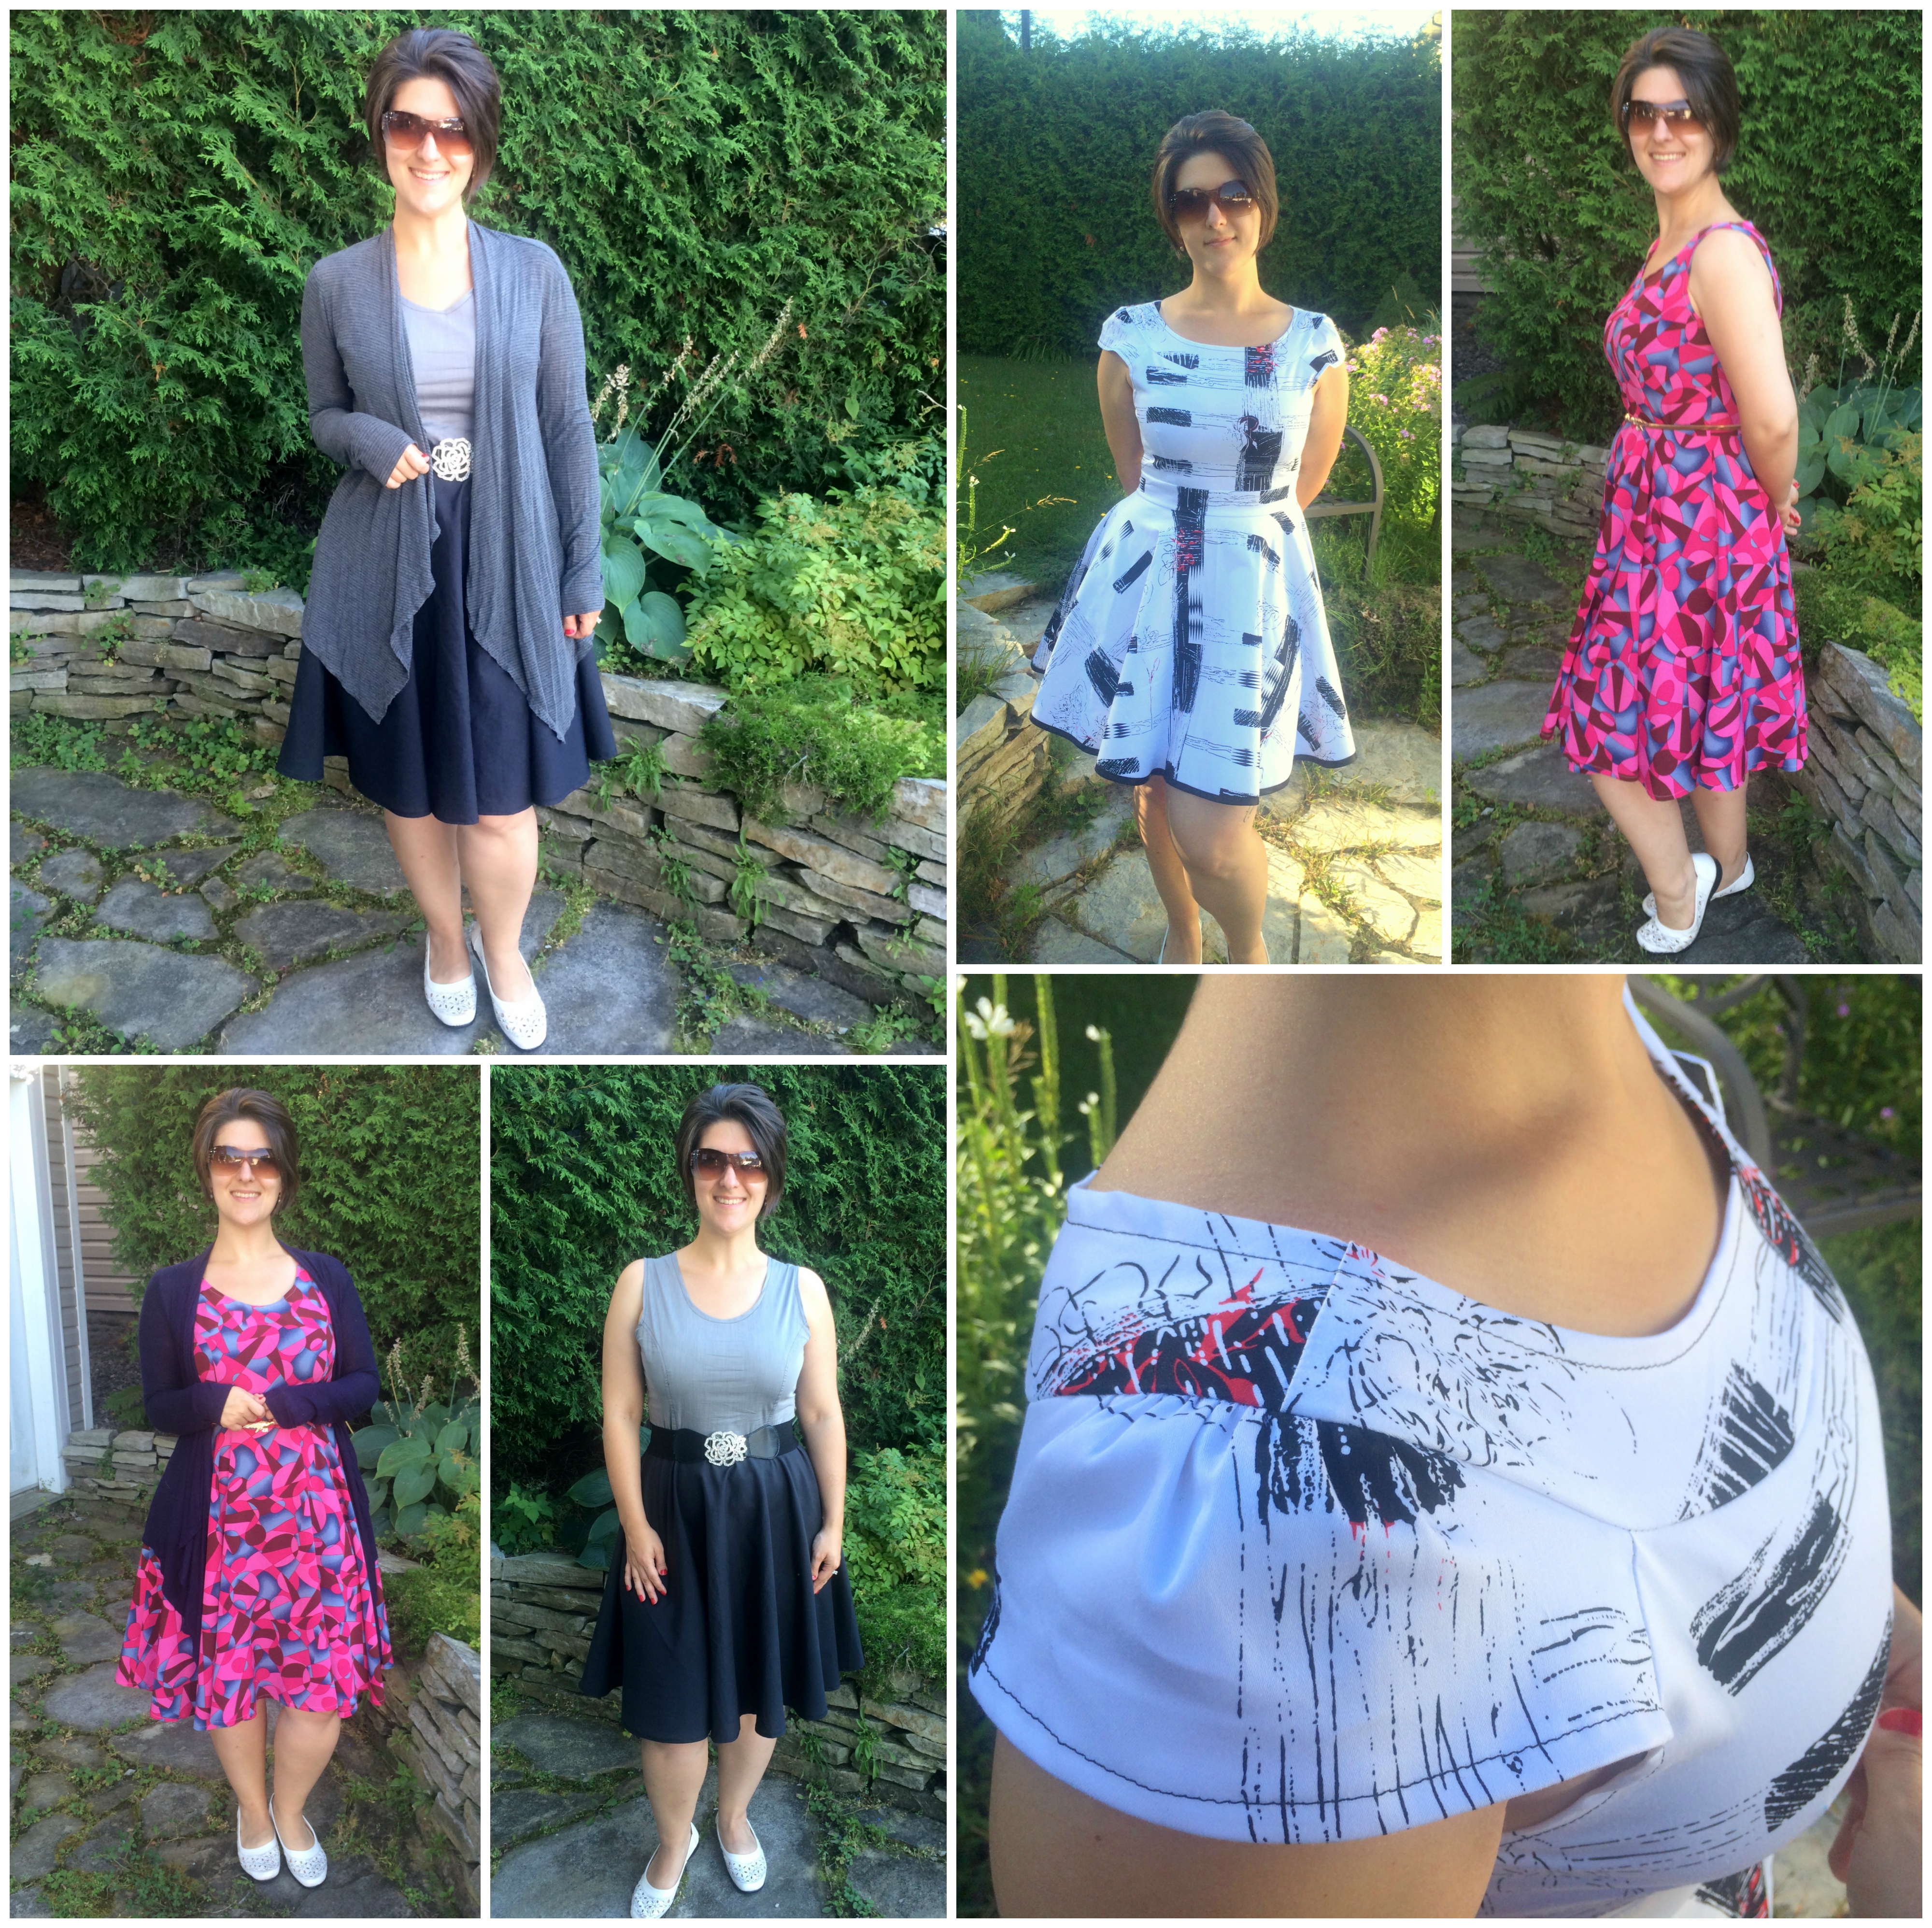
The two sleeveless ones were made using the same princess bodice & circle skirt I have used before from Tanya Whelan’s “Sew Many Dresses, Sew Little Time”.
The third one, in a black & white abstract print, is a copy from a dress I bought many moons ago and liked very much. I carefully un-stitched the original dress, drew the pattern out then reassembled it.
The dress I made using the drawn pieces is very much like the original, I only made two small little changes. First I removed the belt loops that were on either side because I do not intend to wear this dress with a belt, then I swapped the original 6 panel skirt for a circle skirt. Although the skirt is a little shorter than what I usually wear, I am very happy with the result. Hurray!
Sewing obsession
Yep, I guess that’s what’s going on. I’ve made 3 dresses in the past couple weeks and I’ve been cataloging, sorting and organizing my fabric, notions and patterns like a mad person so I guess that sounds about right. And you know what started it all? This one little blog post I stumbled upon written by Charity from The Daring Domestic.
Now I know, it’s nothing new… This article was posted a couple years ago, but it’s very new to me. You see, I’ve been looking for a long time for a way to categorize and easily access my ever growing sewing pattern stash without having to go through boxes and boxes of stuff every time. I needed a tool to help me categorize my patterns with pictures and tags to be able to more efficiently find what I’m looking for and know where it is.
The solution Charity suggested was: Evernote.
This is something I honestly never would have thought of on my own and I was a little skeptical at first, but I decided to give it a try since my first few attempts at cataloging my patterns have been utter failures. I checked it out, tried a couple things and Man, oh man! I think this is it. Not only is it free AND accessible from any device anywhere, it’s also got everything I need – tags, pictures, written information and also a shortcut tool to make things even easier. Let me show you what I’m talking about.
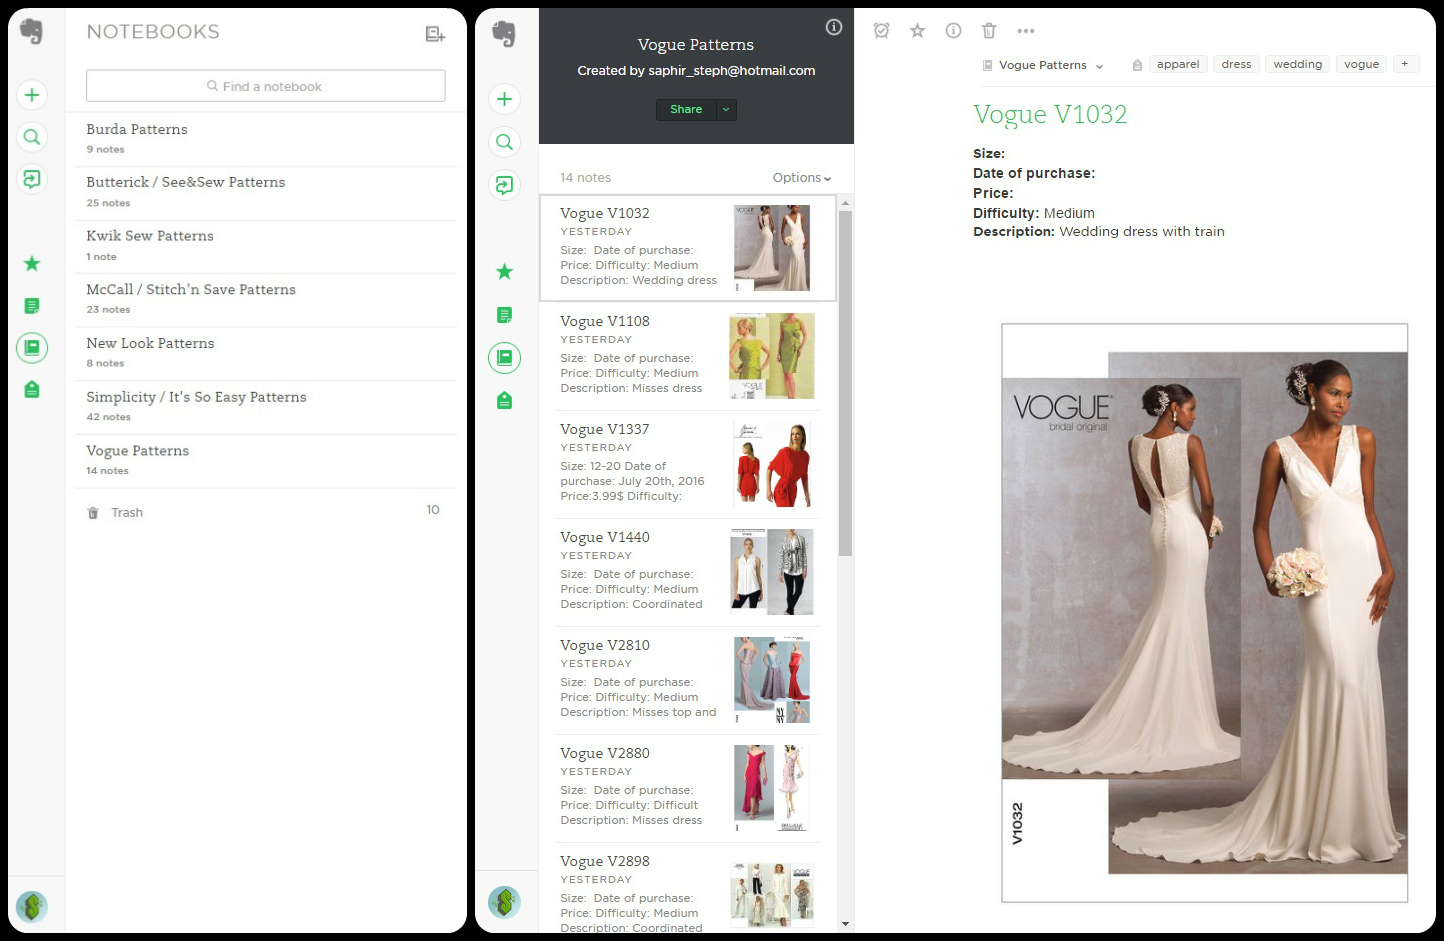
In Evernote, you can create “notebooks”, in which you can add several “notes”. In each note, you can write a title, type in the text you want, add pictures and add specific tags. I created a notebook for every pattern company I own patterns from, then, in each notebook, I created a “note” for each pattern I have, labeling them with the company and the pattern number. In the notes section, I wrote down the size I have, the date of purchase, the price, the difficulty and a short description then added a picture of the front – I will also add a picture of the back when I get a chance to be able to access the yardage requirements on the go. Once my stash will be physically organized and classified in boxes, I will also add the physical location of each pattern (ex. Box B-1).
There’s virtually no limit to the information you can add in there, so one could also use it to write down the mods or changes they made to the pattern, the fabric they plan on using or things they want to remember for the next time they use that pattern.
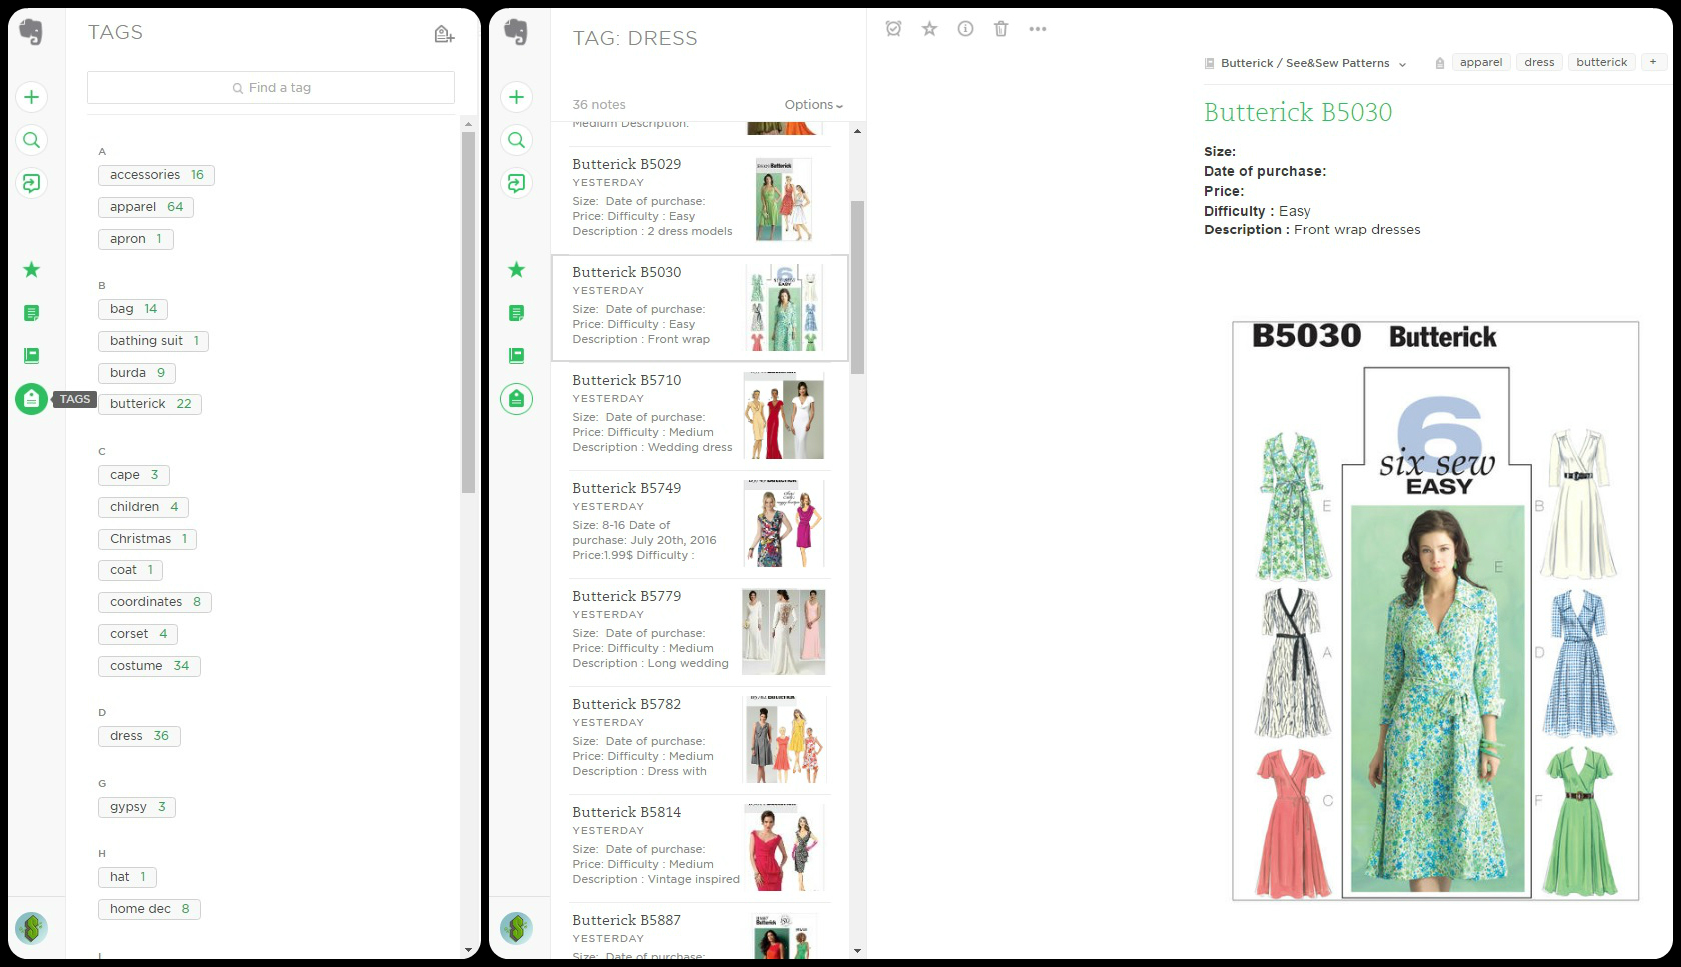
Once the patterns are entered and all the appropriate tags entered, you can search through your notes using the tag function, and that’s what’s so cool about this system – let me explain first for the neophytes. Most people I know organize their sewing patterns by type – dresses together, pants together, etc., that way, when you’re looking something you want to make, it’s easier to narrow it down. But a lot of patterns contain more than one garment in them – separates or coordinates can have all in one a skirt, a dress, a pair of pants, a top and a jacket. And since your physical copy of the pattern can only be stored in one place (unless you have many copies of the same), it can’t possibly be in all those categories at once, so you might miss out on it or forget about it altogether. Reversely, it can also be hard to find said pattern if you don’t remember what category you stored it in. By using tags, you can tag a pattern as “coordinates”, but also enter a tag for all the specific garments it contains, like “dress”, “pants” or “jacket”. That way, if you search using the tag “dress”, your coordinates pattern that include a dress will show up with all the other dress patterns in the search results. Now THAT’S what I call efficiency.
There’s also a really nice feature called “Shortcut” that I find pretty neet. Basically, by clicking on a little star in the top corner of a note, you can link it to your shortcut page. It creates a list of the patterns you link, that you can use as a “To Do” list, or a queue if you will. That way, you never loose track of the projects you want to do next, and you can add information into your note regarding the fabric you want to use, the person you want to make it for or the mods you plan on making.
So, how do you guys organize your stuff?
Sew it up!
Yep, I noticed last week that I haven’t been sewing much lately other than small clothing repairs, and it made me realize how much I’ve been missing that free creative feeling I get when I chose a pattern, a fabric, imagine the multiple possibilities and make it my own. So over the weekend, I scanned through my bookcase, opened Tanya Whelan’s “Sew Many Dresses, sew little time” book I bought last winter and excitedly started a new project.

For someone like me who’s 100% self-taught, this book is gold. Not only does it provide clear instructions and patterns for many different dresses’s bodices, skirts, collars and sleeves that you can mix and match to taste, the author also included sound information on fabric types along with several useful tips and tricks on how (and why!) make a muslin, fit a pattern and make different variations for a different look every time.
I’m very, very satisfied by the style and fit of the dress I made, but what matters to me even more is that what I learnt while making this dress is absolutely invaluable dressmaking knowledge that will help me in years to come to perfect my sewing skills and become better at what I do. I will definitely make many, many more dresses using the patterns and instructions provided in this book and, if you guys want to see them, I will happily share my adventures with you here in the future.
Happy stitchin’ guys! 🙂

